Is enabling a content filter through a DNS an effective approach to protecting your family from the explicit nature of the internet? We wanted to briefly talk about something we’ve seen recently that is a unique approach to creating a filter for your internet. Content filters are actually a really good way to help protect your house from a lot of the negative things existing there. It’s definitely not a perfect solution. But it’s just one more effective measure we can take to help filter out the bad from coming into our world.
What is DNS?
The Domain Name System (DNS) is the phonebook of the internet. Humans access information online through domain names, like NYTimes or ESPN. But web browsers interact with IP addresses instead. DNS translates these into a human-readable form so that they may load resources on websites including articles from any site without needing to memorize an address which can become outmoded over time.
What Is A DNS Filter
A DNS filter blocks a website that it believes is harmful or is hosting malicious content. By blocking access, you can prevent your computer (or any device connected to your network) from downloading and executing potentially dangerous programs on the internet. This way they won’t have any opportunity of infecting one of your systems with malware because they will not even get through! And it’s not just malware either. If you want to block or filter social media sites, or video sites, or gaming sites…it’s easy to do so.
A lot more goes into determining what websites are deemed “bad” than just their URL alone, so these DNS filters check many other factors before deciding if an IP deserves isolation.
Let’s Talk Content Filters
What is content filtering? A content filter is a use of a program, software, or app to filter or “screen” out access to certain web pages (and email) that are defined as bad. You would install a content filter or enable a content filter for your network. In most cases, a program is going to help you select different categories you deem inappropriate for your house to view on the internet. What this will do is help you control content with all the devices in your home connected to your network. So if you want to make sure that pornography or anything like pornography is blocked from the internet in your house, then you can checkmark it. Let’s say you have somebody in your family that suffers from gaming addiction, you can make sure that gaming sites are blocked in your house.
A content filter is really just going to help you block the things your family sees as negative or inappropriate. Although you install a content filter on your network instead of on an individual device, we highly recommend still installing programs at the individual device level for added protection. But when you install a content filter on the network, it’s actually going to cover every device in your home (at least those connected to the network), so this means smart TVs, gaming systems, mobile devices, and tablets; basically, anything that has a screen which could give one access to the internet. A content filter is going to help protect all of those devices. even the ones that might not have a good monitoring app built into them like a gaming system.
Should You Add Content Filtering At The DNS Level?
As always, you should do what’s best for your family. What might be acceptable in one family might not be acceptable for others. We’re all about multiple levels of protection. Kids are smart. The folks behind getting the bad content in front of our eyes are even smarter (heck…most of them make their living doing it). In almost any situation where we’re trying to protect and monitor internet use in the home, there is probably some method or idea to circumvent that protection. People and brands (good and bad) are always competing for eyeballs because eyeballs mean cash. But…sometimes what is put out on the internet isn’t meant for everyone.
Guess what? There really aren’t many perfect solutions to this. And because of that, every little level and a layer of added security is just one more weapon in our arsenal to help us accomplish our goals with proper use of the internet in the home. Should you add content filtering at the DNS level? Absolutely. Is it a perfect solution? Far from it.
We’re going to show you how you can use a DNS content filter called Open DNS to make sure you can filter out the kind of content you deem inappropriate for your home and network. Again, not every home has the same benchmarks and standards for the type of media and content that comes through their network, which is another reason why we like content filters through a DNS.
What DNS Filtering?
First off, what is DNS? The Domain Name System (DNS) is like the phonebook for internet users. We navigate to websites through domain names, such as TMZ or Google. However, web browsers interact with IP Addresses instead. Essentially the DNS translates these numerical codes into human-readable formats so you don’t need to memorize an address that can become outdated over time. Without it, we literally would be lost!
Furthermore, DNS filtering can keep your computer safe from malware and other threats by blocking access to websites that have been determined as harmful or hosting malicious content. This way, the user will basically never receive any file or code which could potentially infect one system with a virus! Depending on the service, setting up a DNS filter is relatively easy (more on that below). We highly recommend a DNS content filter because even though someone could circumvent access to bad content and media, they still won’t be able to do it through your network.
How Can Kids ByPass A DNS Filter?
One way someone can bypass a DNS filter is through the use of a VPN. We’ve talked about VPNs a couple of times. A VPN will take the computer or device and put it on a different virtual network. This new network most likely wouldn’t have the DNS filters set up for those certain websites you wanted to block, essentially rendering your DNS filter on your network useless.
Another clever trick (and maybe not so clever) kids can do to get around a DNS filter is by typing in the IP address directly. For example, if I know that ESPN.com is supposed to be at 45.63. 254.129. I could type those numbers in and that website is going to pop up. And this brings up another interesting topic in and of itself about access to VPNs in your home.
How To Setup Open DNS For Content Filtering
One of our favorite DNS content filters is called OpenDNS. This service is free for home users, which is just awesome. Below are the steps to get you going on this free DNS content filter services (exact instruction may change over time, but the idea is still the same:
From here, go to the “Learn More” button on the Consumer side.
Once you’re in the consumer section, go to “Open DNS Home” and click “Sign Up”. A little side-note here on free vs paid versions. There is a paid version of OpenDNS which is around $20 a year. It gives you Usage stats and an “Optional Allow-list Mode”, which blocks everything except for the things that you have specifically wanted to allow.
Go ahead and sign up by entering all the signup information (it’s required…but hey…it’s free).
You will be directed to a page after signup that will help you set up Open DNS (Set Up OpenDNS On Your Device). When you get to this page you will see the name servers are two IP addresses. This is what you are going to add to your Wi-Fi route. These will be the external DNS servers that you would enter in your Wi-Fi router configuration.
After you set up your account, you will be directed to this page to help you set up your Wi-Fi router. These are the name servers for OpenDNS and will always be the name servers no matter what your account is. Because of that, you’ll want to write these down (or save them in Notepad and email them to you). You will need to enter them into the appropriate location on your Wi-Fi router or your modem.
You’ll want to click on “Home Routers” under “Choose Your Device” to get detailed instructions on different types of routers and modems. If your Wi-Fi router or modem is not listed here (and chances are that it might not be…there are thousands of routers), you’ll want to contact your wi-fi router or modem company on how to set a manual DNS on their device.
Further Customizations Through The OpenDNS Dashboard
Once you get your settings and router (or modem) configured properly, click “Test Your Settings”. You will see the OpenDNS dashboard and will be able to see all the stats and logs for your network. It’s kinda cool if you like to geek out on that stuff. You can also change the settings for your particular network as well, which is another nice added benefit of a free DNS content filter. When diving into the Settings (click on “Web Content Filtering”), you can do custom settings and block all of the categories that you want to be blocked. There are a lot of options to customize: gambling, pornography, alcohol, dating, nudity, sexuality, games, ads, weapons, and on and on. We love the custom setting. But if you’re not into dialing down to the specifics, you can choose between High, Moderate, or Low, which all have specific pre-built category filters set in place for you.
The DNS content filter is now set up and ready to operate. It’s not a perfect solution (a little disclaimer) and there are workarounds that someone can do to circumvent the filter, but you’re getting just another added level of protection on what kind of media and content is streaming through your family’s screens. And we like that.
You’d be surprised how many parents out there have no clue what apps are downloaded on their teen’s phones and what they’re doing with those apps. TikTok is no different. This popular app has already set all kinds of download and usage records among young people and shows zero signs of slowing down. It has disrupted markets, has changed the way we view media, and has forced other social apps to rethink the way they present media. Where do you as a parent fit in all of this? Are you behind the curve with this new social phenomenon? Do you teens have TikTok? Are you making some of the most popular mistakes when it comes to parenting TikTok? We’ve put together a quick list of the common mistakes parents are making when it comes to TikTok.
Common Mistakes Most Parents Make With TikTok
First off: Don’t panic. Mistakes are just disguised opportunities to learn. And despite what others would have you believe, making a mistake here or there is not going to ruin your teen’s life. There’s a lot of research out there on the impact of technology and apps on our teens’ lives. We’re certainly not dismissing that science or trying to undermine its purpose. But we’re definitely not buying into the doom-and-gloom nature some of these organizations seem to really peddle. We sometimes make rash decisions based on fear.
At DDID, we want to instill hope for the world, especially where technology is involved. However, there are mistakes being made out there by a lot of parents. We’ve experienced it. We’ve all seen the parent who just lets their kid stream and play with apps for hours and hours. It might be one of you reading this right now. This is a judgment-free zone. We’re all here to learn how to maneuver and exist in this crazy world of technology and families.
Here are some common mistakes many of us parents make with TikTok:
Ignoring Your Teens TikTok Media Habits
You’re not doing anyone any favors by just ignoring or being lazy about what your teen is doing on TikTok.The Laissez-Faire approach to parenting teens in a tech world is not an effective approach, but unfortunately, it is the most adopted style because it is easy. Do not ignore what your teen is doing on TikTok or online in general. Be involved. Find a way to have shared experiences with your teen and this popular app. Who knows? You might discover something on there you can use to help you with parenting 😉
Ruling With An Iron(Man) Fist
On the flip side of just completely ignoring what your teen is doing on TikTok, putting up an iron dome around your family where no technology, no phones, no tablets, no apps, no streaming services, etc. is quite possibly equally worse than being completely hands-off. Remember the goal: Teach them healthy media habits. Teach them how technology, and TikTok for that matter, can empower their lives. Completely cutting them off from the world of tech and innovation can actually have a negative effect on things like their careers, education, and yes…their social lives. We’ve seen instances where teens without phones are left out of social circles and activities. Furthermore, once they do leave the nest they will have this technology in their palms. Having tech habits established early on in their lives will benefit them so much! It is important for them to have that exposure so they can put technology in its place.
Never Talking About The Emotional Response They Feel
Emotions are important. How we respond to things we see, hear, and say on TikTok will shape the path which lies in front of us. Granted, being aware of our emotions is hard for adults, even harder for teens, but teaching them little mindfulness hacks can help lay the groundwork for healthy emotional intelligence down the road. This is a much-needed skill in this tech-crazy world. Sadly, many of the apps and devices we use can create really unhealthy emotional creatures (we call them trolls on social media). They create trolls in our physical lives too. Nobody wants a troll for a teen. Teaching our teens to be mindful while using TikTok can help prevent that. Here are a handful of questions to keep in your back pocket when having conversations with your teen: How did you feel inside while using TikTok or watching that video? Are you aware of how long you have used TikTok today? Did you see anything today that made you upset? Wanna talk about it? Are you being you when you engage with TikTok?
TikTok Can Be A Great Opportunity…
Again…parenting in a tech world is not easy. It’s not impossible though. Many of us simply don’t want to try because we don’t know how to do it. And simply expecting monitoring apps to do all the parenting work for us is not an effective approach. Are these apps useful? Definitely. Should we only rely on them to do all the parenting? Definitely not.
Technology and TikTok is an opportunity to teach kids and teens about discipline and self-governance. As much as some of us would hate to admit, one day our teens will be gone. They’ll be out of the house creating families and experiences of their own. They will no longer live in the confines of our homes. Are we equipping them with good skills and habits for when the training wheels of life come off? What wisdom are we leaving with them in this world? No pressure, but how we parent through this moment of our teen’s life will influence their lives down the road when we’re not there. Be involved. Have conversations. Teach them the value of technology, apps, and how it can really change the world for good.
Is Gaming Really That Big Hairy Scary Monster We Portray It As?
I’ve heard some crazy things said about gaming and kids. “My kid doesn’t have friends and it’s because he plays video games.” Or “my son has been rude to his siblings and it’s because he’s playing that Fortnite game.” Some of them have an inkling of possibly being true, but some of them are just bonkers. We get it, it’s easy to fall into the trap of blaming our kid’s poor behavior on anything but our parenting, which is why many of these myths continue to be believed. Even with the ones that sound kind of true, it’s just simply not the case. In fact, there are many myths floating around about the effects that gaming has on kids that could be the opposite of true. Some people believe that playing video games leads to obesity, social isolation, violent behavior, and more. But this isn’t always the case! We wanted to break down some of the most popular (and believable) myths about gaming and kids. Let’s take a look at some of the myths about gaming and kids and see if they hold any water.
Myth #1: Gaming Leads To Obesity
Logic would tell you yes this one is true. And this is the problem with some of these myths out there floating around. There is a context of believability about them. When it comes to gaming leading (or causing) obesity, there is no evidence to support the claim. What leads to weight gain is high-calorie and low-nutrient snacks. According to Markus Appel from the University of Wurzburg, “Given our results, it is likely that the energy intake [food and drinks] and their energy expenditure [including non-sedentary activities] are not closely related to playing games.” It is true that inactive behavior, like watching TV or playing outside, is what leads to obesity in kids, but it’s not the “gaming” itself. Now, we understand that playing video games doesn’t lead to healthy and fit kids either. But gaming isn’t causing your kids to be overweight and obese. And if you’re still thinking that this is true, fire up a VR headset and play Beat Sabor on “Hard”…you’ll work up a sweat!
Myth #2: Gaming Leads To Social Isolation
Some people believe that playing video games will lead to social isolation. Again…the logic is there, the believability is there. But how true is it? Let’s take a look at some of the research on this topic.
One study found that there was no significant difference between the amount of time kids spent playing video games and the amount of time they spent talking to their friends. In fact, kids who played video games were more likely to have stronger friendships than those who didn’t play video games. Another study found no significant difference between the amount of time spent playing video games and self-esteem.
Need more evidence? A study by the Norwegian University of Science and Technology found that “video game playing does not appear to lead to social isolation or problems with social interactions.” In fact, the team found that video games are NOT the cause of some adolescent social issues. Imagine that? Now, this doesn’t mean that when children experience these feelings of isolation from their peers they’re not turning to video games to cope. We’re not saying this at all. We understand kids use video games to help manage their emotions and deal with teenage life. But does gaming itself lead to social isolation? Not really. And when we see those behaviors in our kids, we need to be proactive as parents and seize those moments as opportunities.
Myth #3: Gaming Leads To Violent Behavior
This one is actually one of my biggest pet peeves. There is a pervasive myth that gaming leads to violent behavior in kids. First of all, there is no scientific evidence to support the claim that gaming leads to violence. In fact according to Benajmin Burroughs from the University of Nevada, Las Vegas, he said, “There are no longitudinal studies that show a link between violence and video games.” It’s just not there. Think of the millions and millions of kids each day playing millions of hours of gaming. If gaming did lead to violent behavior, this would be one dangerous place.
So why do people believe that gaming leads to violence? Because it passed the “sniff-check.” It plays into our fears. Another reason may be that gamers are often portrayed in the media as angry, socially-isolated males who spend all their time playing video games. But this is not representative of the majority of gamers. The truth is that most gamers are normal, well-adjusted kids who simply enjoy playing video games. My kid games a handful of hours each week, yet is socially engaged, is active in sports, is involved in schooling events, and is the nicest individual.
While it is true that some gamers have played violent video games (and there are a LOT of violent games out there), there are also some people who are affected by violence in the media. Although many scientists believe this evidence is not strong enough to prove a connection between media and behavior, it’s important to be cautious when kids watch any type of media. We’re not saying gaming doesn’t lead to violence so let your kids play whatever games they want. Not saying this at all. Parents still should monitor what their kids are watching and should educate themselves on the movies, TV shows, video games, etc. that their children are playing or watching to ensure they are age-appropriate. It’s interesting that I’ve seen some parents that would NEVER allow their child to watch a rated R movie or a rated M show on a streaming service, but for some reason don’t look at the rating of games they allow their kids to play (Come on parents, let’s be consistent). Now obviously I’m not going to let my 4-year-old grandson play Call of Duty. It’s all about what’s age-appropriate for your child. Listen, just because your kid plays a game where they’re a fictitious character using fictitious and fantastical weapons to take out other fictitious characters doesn’t mean they want to carry out similar actions in real life. Otherwise, why don’t you just block games like Minecraft as your child just might want to get a sword and start combatting zombies, dragons, and killer rabbits! There’s just no connection there. But the bottom line? There is no scientific evidence that supports the claim that gaming leads to violent behavior.
Gaming Isn’t The Enemy Here
It’s clear there are many myths floating around about gaming and its effects on kids. But do any of these myths hold water? Not really. Some do. We’ll say that there are little breadcrumbs of evidence sprinkled here and there linking gaming to psychological and social issues in some individuals, but there still lacks the concrete, causality proof about gaming and some of these myths we hear about. But that isn’t a license for you as a parent to just not manage what your kids are doing and playing when it comes to gaming. There is still something to be said about gaming in moderation. It isn’t necessarily the aspect of gaming that is of concern. The total amount of time spent consecutively playing is something parents definitely need to be aware of. Gaming isn’t the enemy, but we realize too much of one thing isn’t always good. We’ve noticed a behavior shift with our son when he plays too much Fortnite; his attitude changes a bit. We’ve heard this from other parents as well. The key is finding that healthy balance.
PLEASE get involved in their world. Understand what’s going on and what motivates them to want to play these games. Talk to them. Engage with them. Just the little things will go a long way in creating healthy screen time and gaming behaviors for your family.
Sources
Markus Appel, Ph.D., professor, communication psychology and new media, University of Wurzburg, Germany; Jason Bruck, R.N., Mount Sinai West, New York City; June 9, 2019, Social Science and Medicine
In the last year or so, Apple has been getting very serious about child safety in relation to their devices. This latest feature in Screen Time for their iOS is an attempt to move the needle in creating the safest environment while at the same time balancing the privacy of their users. Apple doesn’t want to come off as “Big Brother” watching every little thing you do on their devices, BUT…they still want to maintain that image of taking an initiative when it comes to communication safety. This most recent update now includes tools that will warn users (kids) and attempt to supply them resources if they either receive or even attempt to send images that potentially contain nudity.
Enabling Communication Safety In Apple Messages
Enabling this new feature is very easy. Keep in mind, you must have the latest iOS updated on your device (and your child’s device as well) and you have to have Family Sharing setup. If you haven’t set up Screen Time yet, you’ll want to do that first. Once you have everything in place, follow these really easy steps on how to set up communication safety in Apple Messages.
Step 1:
On your Apple device (most likely an iPhone or iPad), select the Settings app and scroll down to Screen Time. Once you are in the Screen Time frame, you’ll want to select the name of your child under the “Family” section. I have multiple kids so they’re both there. You’ll have to do this for each family member.
Step 2:
Once you’ve tapped on your child’s name, you’ll be directed to their Screen Time main page. Select “Communication Safety”.
Step 3:
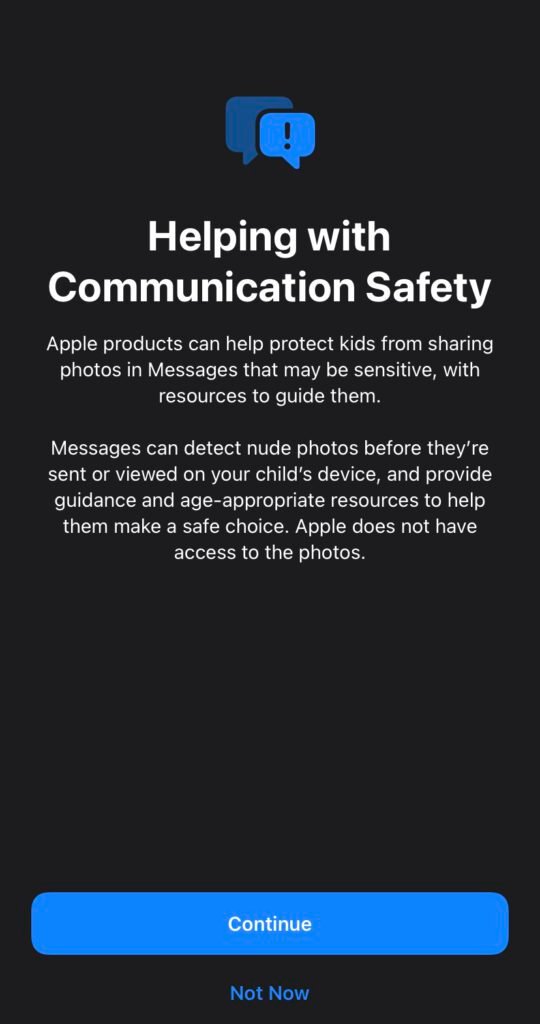
A window (like the one below) will pop up and give you some detailed information about helping with Communication Safety. You’ll want to read this before selecting “Continue”.
Step 4:
Once you hit continue, you’ll be brought to the next page where “Check For Sensitive Photos” will be darkened (turned off). You have to enable it and a message will pop up notifying you that these changes will not apply to your child’s device until their iOS software has been updated (you’ll want to do this or you lose these communication features). Once you hit okay, you’re all set.
What Communication Safety In Apples Messages Will Do
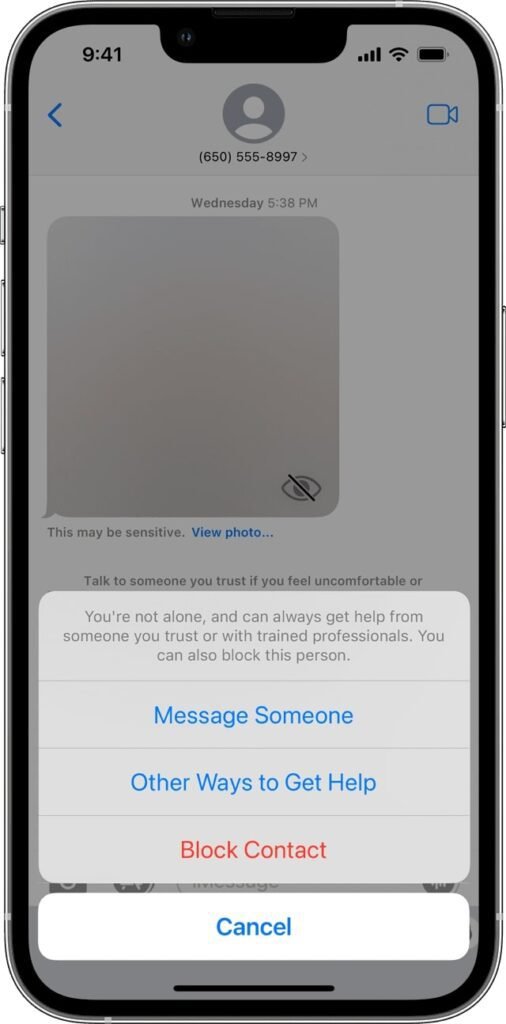
It’s going to notify your kids if they get an inappropriate message. In fact, it will blur out the image before they see it! And…believe me, if your kid gets this message, they’re going to think you’re getting notified as well. The idea of this communication safety feature is to protect your kids from viewing nudity.
What Communication Safety In Apples Messages Won’t Do
It doesn’t stop them from sending inappropriate images. They’ll receive a message about the dangers of doing so before it sends. And who knows? That might be enough for some kids to think twice. It has the potential to give you a false sense of security, so you’ll still want to monitor what your kids are doing and who they’re communicating with. It’s still better than nothing. If you have Screen Time Parental Controls set up properly, you can still decide who your child’s contacts are. You can also determine a “downtime” designation of particular contacts they can call and message. For example, our kids can only call or message Mom, Dad, and grandparents during downtime (ours is set up from 9 PM until 8 AM every day).
What Happens When Apple Detects An Image With Nudity?
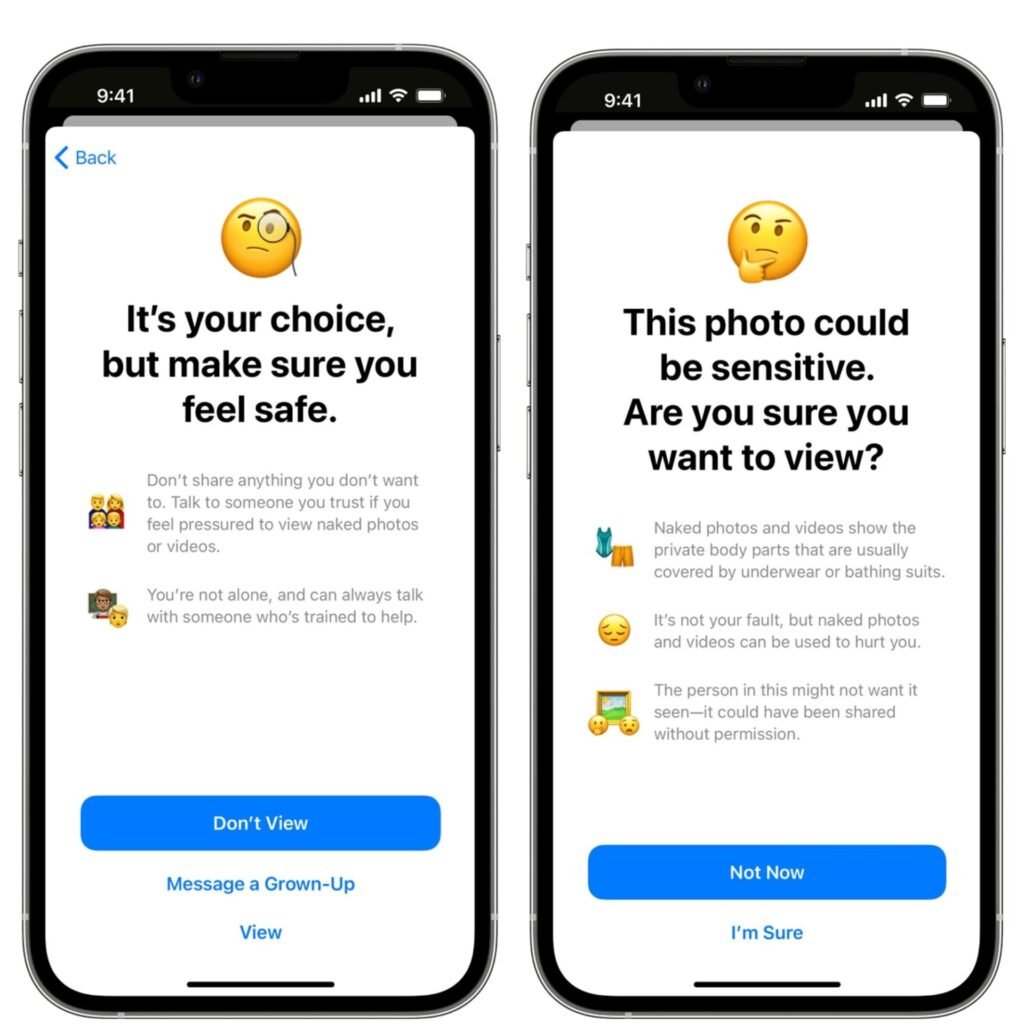
Through some really cool algorithms and data analysis, Message can detect if your kid has received or is about to shoot off some questionable images. It will then blur the image, display a warning of the image’s sensitivity, and offer some pointers on how to get out of this mess of your life. They can message someone they trust (for those under 13).
If your child decides to engage in viewing and/or sending a photo that contains inappropriate nudity, they will get a notification to make sure they want to confirm the action and it also suggests alternative actions the child can take besides sending or receiving this kind of content. Oftentimes, that’s all we need. A little nudge can go a long way and we appreciate what Apple is trying to do here.
Should I Enable Screen Time On My Family’s Apple Devices?
Even if you don’t have kids, enabling Screen Time on your Apple devices is such a cool feature in the Apple iOS. It’s free software that helps you manage your screen time. Screen Time will allow you to place restrictions on apps and schedule downtime (if you have kids, or for yourself). It also gives reports about how your devices are being used, as well as functions that help manage screen time for kids in the house! What it won’t do though? Screen time won’t monitor who they call and message or what content they’re sending out. You’ll need another service such as Bark, MMGuardian or OurPact. If you’re still unsure, you can read more about how to set up screen time.
How Often Should I Update My Apple Devices?
Generally speaking, you should update your iOS whenever you can get the version that isn’t beta. A beta release is basically a pre-release of software usually through an invitation to a large group of super-users with the intention of using it in real-life situations. These beta versions usually don’t last long until Apple releases them at large to the public. But to answer this question: YES! Definitely update your iOS on your Apple devices when you get the notification to. One of the biggest reasons why is because of security. There are some bad dudes out there constantly trying to find a hack into Apple’s OS. To help keep those intruders at bay, Apple does its best to keep its iOS at peak performance. Androids are the same way. So you’ll want to for security reasons. But you’ll also want to because of new, innovative features like the one we just detailed above.
If you’ve been paying attention, parenting and tech are a high priority at DaleDumbsITDown. There is an extensive ecosystem of safeties, dangers, and incredible information so family safety with tech is so important and should be a high priority in the home. We’ve already addressed how to create a child account for Windows 10, but with the launch of Windows 11, it’s again vital to know how to set up, install, and configure the parental controls for this new version of Windows. Here’s a step-by-step guide to setting up and using parental controls in Windows 11.
How To Install and Configure Parental Controls In Windows 11
Windows 11 is now readily available to everyone and it includes many new and improved features and benefits. Out of the gate, we love this new version of Windows for a variety of reasons, chief among them building on its ability for parental controls. It has made it easier to configure various parental control features. You can limit activity on your child’s account using the parental control capabilities included in Windows 11.
We love that tech companies are putting an emphasis on parental controls now more than ever. This involves setting screen time limits, limiting access to websites, applications, and games, and imposing purchasing limitations. If you’re unsure of how to get started, this step-by-step guide is for you. In this Windows 11 Parental Control Guide, we will go through how to use parental controls in Windows 11 and a little into the principles behind setting up parental controls on any of your devices.
Below are several features and steps to maximizing the parenting controls for Windows 11. First things first: Setting up a Child Account.
Keep in mind that both the parent and kid accounts must have their own Microsoft accounts. You can use the same account you did when setting up other accounts in previous versions of Windows.
Easy Steps To Creating A Child Account For Windows 11
When you create a new child account for Windows 11, you will be prompted to create a new Microsoft account to link to the child’s account.
Here are the primary steps for creating a child account in Windows 11:
On Windows 11, open Windows Settings by hitting the Windows and ‘I’ keys at the same time.
You can also click on the Start menu and then select the Settings app.
Go to the Accounts tab or click on your account from the top.
Select the Family and other users option.
Click the Add account button, which is located next to the Add a family member option.
Then click on the “Create one for a child” button.
Enter the email address associated with the child’s account and click Next.
Enter the password and click Next.
Enter a name and then press the Next button.
Choose the child’s nationality, input the child’s birthdate, and then click Next.
The birthdate essentially allows Windows 11 to enforce age-based limitations automatically. It’s a nice feature we like, so it’s best to add it.
Finally, click the Next button, and the kid account will be established and linked to your existing account.
In the future, you can change the account type or disable sign-in for the newly formed child account by navigating to your Account Settings.
Configuring The Parent Control Settings
After creating your kid’s account, you must configure parental control settings to prohibit specific websites and other potentially harmful information your kid might be able to access (whether intentionally or by accident). This is a golden feature of parental controls with Windows 11. We love that Microsoft is making these kinds of features a priority with each new version they launch.
The following are the key steps for configuring parental controls in Windows 11:
Navigate to Settings then Accounts then Family & additional users.
Select the option Manage family settings online or remove an account. It is possible you might not be logged on to your Microsoft account.
On this new browser page, click Sign in.
Write your email phone or skype account and click next.
Write your password and click Sign in.
Here is a really important part: If you only use this computer you can stay signed in if not click No.
Choose the kid account for which you wish to enable parental restrictions.
You can click on the 3 dots menu and click on Go to overview. This is when you’ll be able to really customize your parental settings for each kid account.
On this page, you will be able to establish a screen time limit, use content filters to restrict websites apps + games, and enable spending reports and other spending controls. On the Family Safety page of your child’s account, you will find many tabs on the left panel, such as screen time, content filtering, and spending. You can configure each of these variables individually and according to your needs. As we’ve discussed in previous articles (depending on how old your child is), it’s important to discuss with them some of the parental settings and controls you place on their devices. The key is to be open and honest and explain the why behind your actions. Another key point is kids don’t need to know every choice you make as a parent, especially involving tech. BUT…it’s still important to have those healthy conversations with your family about the proper use of the technology that is a major part of our lives.
Configuring Screen Time Limits In Windows 11
To configure screen time limitations:
First, go to the Screen Time page and enable the “Use One Schedule on all devices” toggle.
From here, you will be able to set a daily screen time limit. A little tip here always starts small. Giving your kid a lot of time out of the gate may not be the smart option from the get-go. You can also select the” Everyday option” if you wish to have the same routine every day.
Simply select a specific day and then a time limit. This will allow you to adjust or create additional schedules to allow your child to use the account only during that time span.
Again…these added customization layers are such an awesome feature of Windows 11!
Creating A Schedule For Your Child’s Account In Windows 11
To create a new time schedule:
Select the “Add a schedule” option and enter the time period for the child account’s usage. You can add several time periods this way and increase the screen time limitations.
Click the Done button.
Next, navigate to the Content filters page and toggle the Filter inappropriate websites and searches option under the Web and Search area.
This enables SafeSearch with Bing and blocks any mature content on a child’s account.
Enabling And Allowing Websites On Your Child’s Windows Account
On the flip side, if you simply want to enable specific websites they can visit (like your favorite 10 age-appropriate sites), you can use the “Only Utilize Permitted Websites” option.
To add websites that you want to allow on the child account, click the Add a website (+) option located under Allowed sites. Similarly, you can restrict access to specific websites by clicking the Add a website (+) option under Blocked sites. Furthermore, you can enable activity reporting to see and track searches and web activity on your child’s account.
Again, this level of parental control and tracking are the kinds of features we should expect with devices entering the market in the 2020s.
Restricting Apps and Game In Your Child’s Account
There are still a few more filtering options to enable and enhance. In the same Content filtering menu, navigate to the “Apps and Games” area.
You can set an age limit here to enable only age-restricted apps and games on your child’s account. If your child requests access to a certain app, you will be prompted to do so. You have the option of granting or denying the requested access.
If you’ve ever enabled screen time tracking and features on an iPhone with your children, it operates the same way.
What about an app that you’ve previously blocked? If you want to allow access to an automatically blocked app, go to the “Blocked Apps” section and click the “Remove” option.
What about spending? Next, you’ll want to find the Spending page and enable the activity report for your child’s device spending. Again…you won’t want to skip over this. To enable this feature, turn on the “Turn on activity reporting” toggle in this tab. From here, you can block your child from making purchases of any kind, set spending limits (yes, this is a feature some parents love), and enable spending notifications. You can also look into payment methods from this page.
Find Your Family On A Map With Microsoft
Microsoft provides a “Find Your Family On a Map” tool, which allows you to use the Family Safety mobile app to check the real-time location of your child or another family member. Before you panic at the idea of having Microsoft track your kid, push pause for a minute. Your devices are already tracking you. This is just par for the course with smart devices in this day and age. The Family Safety mobile app is free for iPhone and Android users. Once you have this feature enabled in parental controls in Windows 11, just log out from your main account and leave your child to connect to the newly created account. Simply sign in with the new account created for your child and Windows 11 will guide you through the process. After you have configured the account your children can easily use this account on the computer and you don’t have to worry…as much.
Some Parting Words Of Tech Parenting Advice
Even though we set up parenting controls and have all the settings and configurations enabled, it’s still not a replacement for responsible parenting. It’s still vital to have normal, healthy, and consistent conversations with your family about our smart devices. Make these conversations a part of your family’s culture. They’re important. It’s also really important to not allow your kid to use your personal account as this will not protect them. Do not share your password with your children because it defeats the purpose of setting all of this up. We hope this guide has been useful in configuring and using parental controls in Windows 11 for your family. For more information on family safety with tech, follow our blog with regular updates to help your family.