Any office with many devices should invest in the best network switches on the market. All of the PCs, printers, and networking equipment in the workplace may put a lot of strain on the network, so keeping a reliable and fast network switch is essential. You want to keep your business smooth and operational right?
For the most part, many network switches will meet your requirements regardless of your budget or network size. Trust me, there are cheap network switches that will get the job done, but when it comes to business, you do want something nice and of high-quality. There are modest alternatives for just a few network-connected devices and bigger versions with a high number of ports to handle a large number of network-connected devices.
We know that it can be an overwhelming decision to choose the best network switch for your small business, so we have prepared a list where you can easily select the type of switch which best fits your small business needs. Let’s cover some basics first…
What Is A Network Switch?
Today, networks are critical for supporting companies and facilitating connections across the company. A network switch, which connects multiple devices to convey resources, is essential for all networks whether business or home.
A network switch joins devices on a network (commonly known as a LAN) and sends datagrams to and from them. A switch, unlike a modem, only distributes data to the one object for which it was designed (which might be another swap, a modem, or a person’s laptop), not to systems of numerous devices.
A managed switch performs the same purpose for considerably bigger networks and gives network managers even greater control over traffic prioritization. They also allow developers to design Virtual LANs (VLANs) to partition a regional system into smaller sections.
How Does The Network Switch Work?
I’ll try and keep this as simple as possible. When a device is attached to a switch, it records its Media Access Control (MAC) address, a code included in the device’s Network Interface Card (NIC) that connects to the switch through an ethernet wire. The switch uses the MAC address to determine which associated device is sending outbound connections and where inbound data frames should be delivered. In contrast to the protocol stack (Layer 3) Internet address, which can be issued periodically to a computer and varies considerably, the MAC address specifies the hardware device.
Whenever a device transmits a signal to some other unit, the switch examines the packet’s payload to identify what to do next. It validates the location or ranges and sends the packet to the target machines through the proper ports. While switches function at Layer 2, they may also function at Layer 3, which is required to enable virtual LANs (VLANs), which are network component segments that cross subnets. Traffic must flow across switches to move from one domain to another, which is helped by routing systems installed into the switches.
Top 5 Network Switches For Small Business
When it comes to choosing the best network switch for your small business consider first the number of devices that will be connected to the switch. You’ll need a switch with enough ports to accommodate all of your devices. Secondly, think about the speed of your network. If you have a lot of devices or large files being transferred, you’ll need a fast switch. Next, consider the features your business needs. Some switches come with features like Power over Ethernet or VLAN support. And finally, don’t forget to factor in the cost. You have to think about cost in the vacuum of “value” as well. Small business network switches can range in price from around $100 to $1000, so you’ll want to make sure you choose one that fits your budget BUT still checks the boxes of what you need for your small business. There’s nothing worse than spending a little under your budget for a small business device that just doesn’t cut it.
By keeping these things in mind, you can narrow down your choices and find the best network switch for your small business. The following switches below are considered to be some of the best network switches for small businesses in the world.
1. Netgear GS105NA Prosafe 5
The Netgear GS105 is an uncontrolled 5 port Gigabit Ethernet switch that definitely will help you in connecting devices for your smaller businesses without any hassles. This product comes with a lifespan warranty coverage and a repair within one business day, so you won’t have to fear using a malfunctioning item.
Installation is simple and requires no settings.
Fanless design means no extra noise.
Low Electricity Consumption + Energy Efficient Design Compliant
2. Netgear GS108
The Netgear GS108 is a phenomenal network switch with 8 Gigabit Ethernet ports that don’t require any configuration. It provides excellent internet connections without making a sound because it is constructed without fans.
Any small firm needs a good variety of Ethernet adapters.
The design is simple and does not draw notice
Simple plug and play setup with no software install or configurations
1G, Mega, and 10G speeds are available
Supports Cat5, Cat5e, and Cat6
Layer 2 supervision
Energy Efficient Design Compliant
3. Linksys Business LGS108P
This small business network switch offers eight Gigabit Ethernet connections to provide your small company with the speed it needs to run smoothly. Furthermore, you can hit up to 10 Gbps, considerably improving your capacity to broadcast elevated files to linked devices without latency or interruption. This is one of those devices where employees won’t be able to periodically blame technology for not being able to get things done.
It also comes with no fans to keep the noise minimum
Up to 24 Gigabit Ethernet auto-sensing ports
High internet speed up to 1000 Mbps
High-quality services in the form of QoS for intelligent prioritization of traffic
Easy plug and play connection
Power over Ethernet (PoE+) support
Connectable to multiple ports
Meets EEE (Energy Efficient Ethernet) standards
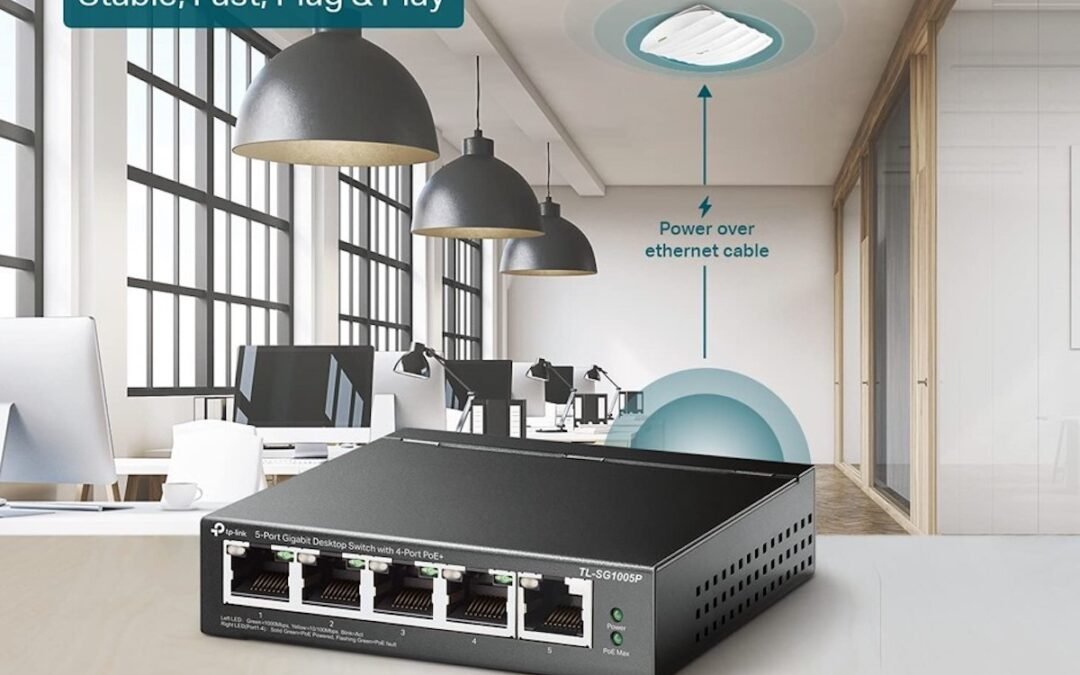
4. TP-Link 24 Port Gigabit
If you have a residence or private office and prefer the security of a cable network, you understand the necessity for a switch port with a large number of ports. The TP-Link contains 24 of them and they will all work at full speed even when they are all connected. This is one of my favorite network switches for small businesses. Some of the incredible features include:
Less Power Consumption + Super Quiet
Enhance Network Connectivity
Plug and Play with no software installation and no confusing configurations to setup.
Limited Lifetime Warranty + Free 24/7 Technical Support
No Hardware Licensing
Full Remote Management
Energy-Efficient Technology
Multiple Power Ports
Increased Reliability WITH Reliable Speeds
24x Non-Blocking Gigabit Ports
QoS For Traffic Prioritization
5. Cisco Systems 24-Port Gigabit Switch
The Cisco Systems 24-Port Gigabit Switch is an unregulated switch great for small office settings. It does not need installation, comes in a small portable, and is easy to manage configurations. There are some small business-related features that I just love about this network switch:
It comes ready to roll right out of the box
No software to install + no configurations
Energy-efficient design that doesn’t impact performance
Do I Really Need A Network Switch For My Small Business?
To reiterate, a network switch is a crucial tool that helps in connecting multiple devices to your computer network. It works by receiving data packets from the sender devices through its physical ports. Let’s remember: the main purpose of using a network switch is to develop a connection for sharing resources.
If you’re running a small business, you might be wondering if you need a network switch. The answer to that depends on your specific needs. If you have a lot of devices that need to be connected to the internet or if you need to connect multiple devices to a single network, then a network switch can be an incredibly helpful addition. In my opinion, I think a network switch is a good idea for most home networks where someone is using their home as an office for remote work. However, if you only have a few devices that need to be connected, or let’s say you’re only using one network…then you probably don’t need a network switch. Ultimately, it’s up to you to decide whether or not a network switch is right for your small business.
We get it…as a small business owner, you know every penny counts. You need to be careful about how you spend your money and you need to make sure that you’re getting the most bang for your buck when you do decide to invest in technology. When it comes to network switches for a small business, it’s important to invest in quality (we’ve provided some solid examples in our reviews previously mentioned). Network switches are great small business additions because it helps to connect all of the devices on your network PLUS it provides a central point for managing traffic. From my perspective and as a business owner, I believe it’s an essential piece of equipment for any small business. A network switch is a worthwhile investment for any small business owner who wants to keep their operation running smoothly.
If you’re like most people, you probably don’t think about your VPN service and all its bells and whistles all that much. You may know that it’s important for security and privacy, but beyond that…there’s a good chance you don’t know much about what it does and how it protects you. We wanted to take a closer look at what VPN split tunneling is and explore how important of a feature it is if you’re looking for a VPN service. VPN services come with tons of exciting features, most of them your basic internet user would have no clue why or how important they are. While some of them are basic, others are advanced. Some of these options are not available with all VPNs, but one such feature is known as “split tunneling” is quickly becoming a mainstay with VPN services.
What is VPN Split Tunneling and how does it work? Most importantly, do you really need it? We’re going to hit on these questions and try to simplify this amazing feature so you understand a little bit more about what it does. Plus, I’m going to dish on two of my favorite VPN services that have done a masterful job of making split tunneling a core feature in their VPN service.
Everything You Need to Know About VPN Split Tunneling
In the most simplified way of explaining what it is, VPN split tunneling is a feature that allows you to selectively route traffic through your VPN. This can be useful if you want to keep some of your traffic private, but don’t want to encrypt all of your traffic. Below we explain a little more in-depth on what split tunneling is, how it works, and the types of split tunneling you should have a basic knowledge about. We’ll also cover some of the benefits and drawbacks of using split tunneling.
VPN split tunneling is a feature that can divide your internet. It allows you to send some data through an encrypted VPN tunnel and route the remaining data through an open network. Usually, split tunneling is used to decide which applications you want to secure.
VPN split tunneling can be very useful to keep your traffic private. Its most valuable trait is security. At the same time, you can maintain access to the local network. In short, you can connect to both local and foreign networks simultaneously.
Split tunneling helps you control which data you want to encrypt. It also lets you send data faster on the unencrypted network. Here’s how split tunneling works:
Usually, most devices have one direct connection to the internet. It is the single channel to send and receive data. However, VPN helps you secure the connection between your device and server. Therefore, your data is received and sent through the secure VPN server. While your data remains encrypted, VPN can cause your internet speed to slow down as all the data travels through it. This is one of the main drawbacks and the most frequent complaints I hear about VPNs is you sacrifice speed for security.
On the other hand, split tunneling offers two connections simultaneously. You get an open connection to the internet and a VPN connection. This way, your sensitive data is protected, while not affecting your internet speed at all.
Types of VPN Split Tunneling
There are three main types of VPN split tunneling. Each one serves a purpose and is really up to you to determine which one better suits the types of activities you do while using the internet. URL-Based Split Tunneling allows you to choose which URLs to encrypt. App-Based Split Tunneling lets you choose which applications you want to encrypt through a VPN. Inverse Split Tunneling routes all the traffic is automatically sent through a VPN unless you specify.
There are a couple of really important areas why I think you need split tunneling as part of your VPN. Here are two of the most important reasons why I think split tunneling should be something you prioritize with your VPN service:
Multi-Tasking
Split tunneling helps you increase your productivity. It is a clever feature that allows you to do multiple tasks at the same time. For instance, you can stream foreign content while using services from the local network. Similarly, you can also access network-connected devices, such as hardware, while surfing the internet safely and privately.
Better Internet Speed
Since data is transferred via multiple connections, the internet speed is not slowed down. On the other hand, VPN can drastically affect the speed, even for simple tasks, such as internet surfing. Hence, split tunneling can be a necessary feature if you have slow or mediocre internet.
My Favorite VPNs That Have Split Tunneling
You should really consider a VPN service with split tunneling if you have a slow internet connection. It helps you keep your speed while also offering privacy for selected applications. With that said, here are my favorite VPNs that feature split tunneling as part of their basic package.
Express VPN
ExpressVPN is one of my favorite VPN services. Not only are they a major player in this niche, but with servers located all over the world and unlimited bandwidth, you can’t go wrong! Plus their support has been great too. I’m happy to say that after trying out several competitors’ services it’s nice knowing there’s one provider who will always have an answer for me when I need one fast (and reliable).
Norton Secure VPN is a great option for those who need to protect their information from hackers. The new Split tunneling feature allows you to choose which data should be secure without losing access to local services. Another awesome security feature includes anonymous browsing with a no-log policy so that things like online purchases are never tracked!
If you’re like most people, you’re probably not as tech-savvy as you’d like to be. And that’s okay, there’s no shame in admitting that you need a little help now and then. One area where it’s especially important to stay up-to-date is with your internet browser. So if you’re using an older version of Google Chrome, we urge you to update it immediately. Google Chrome is easily the most popular internet browser. It is easy to download, install, and use. The best part is that the browser stays fresh with new updates every now and then. In fact, based on our personal use of multiple browsers, Google Chrome has the most frequent updates of any browser on the web.
But, the real question is, why should you update your Google Chrome browser? Several factors can cause inconvenience to you if you use an outdated browser. Here are the top 5 reasons to update your Google Chrome browser immediately.
5 Reasons to Update Your Google Chrome Browser in 2022
Google Chrome is used by millions of people every day for all sorts of activities, from shopping to banking to checking email (and a whole lot of other purposes). Those are just a few of the reasons, but let’s dive into more details on why you should update your Chrome browser right now.
1. Stay Secure
The biggest reason to update your Google Chrome is to tighten up the security. When any software is outdated, it makes an easier target for attackers to exploit. They can easily get access to your necessary information with simple attacks. The same can be said for Google Chrome.
People store valuable information on the Google Chrome browser (email passwords, credit cards, etc). Whether it is your account details or history, your data can be easily leaked if you do not update the browser. There are minimal to no chances of cyberattacks with the latest updates installed. Since Google accounts are shared through various other platforms, protecting your data becomes even more essential.
2. New Look And Feel
Google Chrome does not let users get bored of its UI design. That is why almost every update comes with a new aspect of the browser’s appearance. It allows you to surf the web with a fresh-looking browser.
Google Chrome updates always come with new features. Almost every major update integrates something new and valuable to the browser AND adds something valuable to the user. You might be missing some key features in your outdated version that can cause you to lack behind.
4. Optimized Speed
This is probably one of the most underrated reasons (and often overlooked) for updating your internet browser. The only big complaint most people have with Google Chrome is its speed. While the browser is quite fast, opening multiple tabs can slow down your device if it is not compatible enough. Luckily, the browser keeps adding new features that minimize the load time and offers optimized speed. So…if your Google Chrome is getting slower, it’s the right time to update it.
5. Fixed Bugs
Yes…even Google products get a bug or two. With every update, you might find some minor glitches. Sometimes, these can be major and affect the browser’s overall performance. However, Google Chrome fixes its bugs in every update to offer you an error-free experience.
Google Chrome’s latest updates added and enhanced the following features:
Tab Group Saving: Grouping tabs are an excellent feature that helps multiple research sites at once. However, saving these grouped tabs allow you to take a break and continue from where you left off.
Add Notes to Saved Passwords: Saving passwords helps you save time. But, with this new feature, you can add notes with passwords to remember the context of your login details.
Updated Downloads: Now, you can view individual progress bars for each download. Plus, the options in the list are made more interactive.
What Are You Waiting For?
Get updating! It’s important to keep your browser up-to-date so that you have the latest security features and can take advantage of the newest updates and improvements. Plus, who doesn’t like a little, shiny new thing? Updating your Google Chrome browser is easy, just follow these simple steps and you’ll be securely (and up-to-date) browsing in no time:
Step 1: Open Google Chrome
Step 2: Click the three dots icon in the top right corner of the browser.
Step 3: Click “Update” (if it’s available). If it’s not available the chances are that you already have the latest version.
Step 4: Click “Relaunch To Update Chrome”
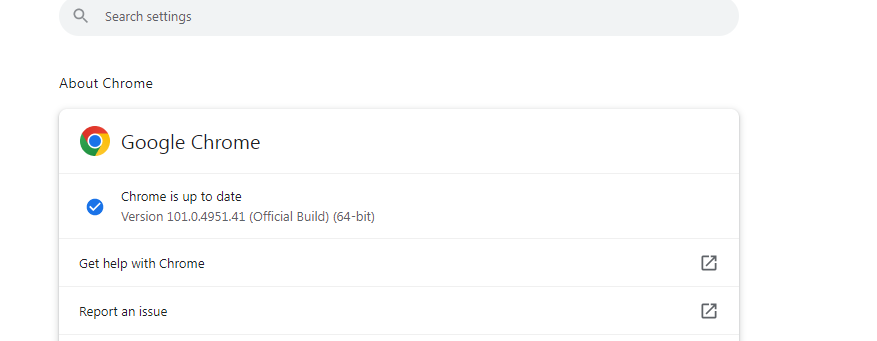
Another really easy way is to click the three dots in the upper right-hand corner of the browser. Then click “Help” then “About Google Chrome”. From here you’ll be able to see the status of your browser. Many people forget to relaunch so the update never completely finishes. If your Google Chrome browser is updated, you’ll get a message like the one in the image below…
If you’re like me, you probably have a ton of devices that need to be connected to the internet. And if you’re also like me, you probably don’t want to spend your whole day wiring them all together. That’s where network switches come in! We wanted to explain in a simplified way what network switches are, how they work, and whether or not you really need one.
There is not a single piece of equipment that can function without a network in today’s world. You want to be aware of political events, celebrity news, business news, financial news, and economic trends to pool your investment and connect with your team members to brainstorm business ideas; all of this would need the assistance of a robust network.
To use a network, you’ll need a network switch and an understanding of how it works and why you need it. Why bear the weight alone when you can enlist the assistance of someone with knowledge in switching and innovation? Read on to learn what a network switch is and why you should have it.
What Is a Network Switch?
How are people using the internet these days? Most people use the internet through their Wi-Fi router. We rarely see wired connections in homes, but this does not imply that the wired system has been replaced or is no longer in use. Most households do not require a network switch, but it is handy if your router does not have enough Ethernet connections. Most home routers provide three or four Ethernet ports. You need a network switch to connect more devices.
A network switch is a device that connects to your home router to provide additional Ethernet connections. Consider it similar to a USB hub, but for networking. There are certain areas with many connected devices in one place, such as a real estate office’s sales or marketing department, where you can use wires to increase your speeds or reduce wireless disturbance.
Pros of Using Network Switches
Before you decide on whether you need a network switch or not, let’s first check out what value can use a network switch add to your business:
Enables More Device Connections to the Local Network
You obtain extra LAN ports when connecting a network switch to your local network. Each LAN port can accommodate an additional device, increasing the number of devices connected to a single network.
Has a Faster Speed Than a Wireless Network
This is my #1 reason to use a wired connection over WiFi. A network switch may provide speeds of up to 10 Gbps or more. In comparison, the highest potential Wi-Fi speed is roughly 9.6 Gbps, and in fact, you’ll seldom receive speeds beyond 1 Gbps. This means that wired network connections are often significantly quicker than wireless ones.
When you transfer network data via a wireless network, it gets distributed to all linked devices, which causes traffic congestion. Switches are way more intelligent than Wi-Fi in this case. They maintain track of all connected devices’ unique MAC addresses, so it routes most network communication to the intended receiver rather than being exposed to everyone.
Ensures a Steady Internet Connection
Because Wi-Fi transmissions are susceptible to interference, they are not 100% reliable. Signals don’t always navigate their way through barriers and obstacles. Most people use their Wi-Fi connections close to their router; this produces a lot of interference from other networks and other devices. While using a network switch to connect PCs eliminates these concerns, your network speeds will stay consistent.
Network Switches Safeguard Against Cyber Threats
Since their beginning, wireless networks have been hampered by security challenges. The wireless transfer of data opens up additional cyber-attack avenues. Your Wi-Fi network password can be stolen, providing hostile individuals access to sensitive information in the region. Furthermore, you might have someone in your family share passwords with neighbors and friends.
You may use a network switch to link all your computers to eliminate attack risk. An attacker would have to obtain physical access to your premises to hack it for the wired network. Any intruder will need to access your network through a wired cable if you use a switch, which can only become possible through direct access.
You are the only one who can decide the requirement for a network switch. If you own a business and want to stay ahead of the competition by preventing a hacker from accessing your data, a network switch is a way to go.
Furthermore, keep in mind that installing a network switch might be more expensive than using a wireless network because having a cyber-attack-free network for your company comes at a cost. So, using a network switch is a smart option.
Network Switches Are A Solid Investment For Your Home or Business Network
As previously stated, a network switch provides a variety of advantages. However, if you believe that you require this sort of network at your house in addition to a business, you may easily set it up. You can readily analyze the benefits and downsides of employing a network switch. If these advantages offset the high expense of using the network switch strategy, you may be able to save the day by keeping your data safe and your network working smoothly.
If you’re finding that your Windows 11 computer is running a bit slow, don’t worry – there are plenty of easy ways to speed it up again. Windows 11 is the latest addition to Microsoft’s vast library of operating systems. Since it is newly released, it at times lacks some basic speed functionalities. However, that is all set aside comparing the speed of Windows 10 and 11. The latter is comparatively slower, but we may see an increment in new updates. According to Windows Latest, their benchmarked speeds with Windows 10 vs Windows 11 show a pretty sizable drop in read operations and write speeds.
Hopefully, some of this gets rectified with updates, but until then, users are left with a lack of responsiveness and slower speed. However, this really quick Windows 11speed up guide will help you speed up Windows 11 with some very simple steps. Seriously, implementing all of these will take you no more than 10 minutes (even for the most novice user of computers).
How to Speed Up Windows 11?
If you’re like most people, you probably want your computer to be as fast as possible. With Windows 11, there are a number of ways to speed up your machine. We’ll show you some of the best ways to get your Windows 11 computer running at top speed, but before going through different ways to speed up Windows 11, let’s look at some factors that slow down the performance in the first place.
What Could Be Slowing Down Your Windows 11
Low RAM
Having a low virtual memory can heavily affect your Windows. That’s because operating systems automatically start using storage devices as primary memory when RAM runs out. There are two methods to solve this. You can either use RAM cleaner to make room. If that does not work, you might need to upgrade.
Running Out of Space
It is common for a computer to run out of memory. However, it slows down all processes of your Windows.
Drivers Out of Date
If your drivers are outdated, it is best to update them. That’s because hardware and software updates can heavily affect Windows 11.
Here are a handful of super easy, super quick fixes that are guaranteed to speed up your Windows 11. Granted, there are some more advanced tactics you can employ (and maybe we’ll cover those in another post down the road), but these are simple enough for even the most basic of users to understand and execute.
Make Sure Windows is Updated
Don’t roll your eyes! Updating your operating system (your browser too! Oh yeah…and all your other devices and apps) is not only going to speed up your devices, there are probably some valuable security patches as well. PLUS…those notifications do take up processing power. We’d also like to note that the February 25th update (Windows 11 KB5008353) fixed speed issues for SSD users ~ another reason to update regularly!). Follow these really easy steps:
Click on the Windows button and choose Settings.
From the left pane, click on Windows Update.
Now, select Check for Updates.
Windows will look for new updates and automatically install them.
Once installed, restart your PC.
Disable Startup Programs
Another really easy measure to do:
Click the Windows button and choose Settings.
Go to Apps and click Startup.
Disable the switch for unnecessary apps on startup.
Now, click the Start button and open Task Manager.
From the top bar of Task Manager, click on Startup.
Now, right-click and click Disable on any program you don’t want to load on startup.
Disable Visual Effects
If you want your computer to run faster, then disabling visual effects in Windows is a good idea. This will help speed up your machine, especially if it’s an older model. However, if you don’t mind a noticeable slow down and really enjoy the pretty animations, then there’s no harm in leaving them enabled. Ultimately, it’s up to you and what you value more: speed or aesthetics. Here are those steps for disabling visual effects in Windows 11:
Press the Windows key, and type view advanced to select View Advanced System Settings.
Select Advanced, and click on Settings.
Now, check the mark on Adjust for Best Performance option.
Under Custom, checkmark on Show Thumbnails instead of icons and Smooth Edges of screen fonts.
Lastly, click on Apply and OK to save the changes.
I really like this Windows 11 speedup hack. Storage sense is a great way to speed up your computer by freeing up space on your hard drive. It’ll automatically delete temporary files and old versions of files that you don’t need anymore, so it’s a great way to keep your computer running fast and smooth. Plus, it’s really easy to use. Just open up storage sense and select the drive you want to clean up, and Storage sense will take care of the rest! Here’s how to enable this awesome Windows 11 speed up feature:
Press the Windows button and choose Settings from the list.
Go to System, and select Storage.
Turn on Storage Sense with the toggle button.
A Need For More Windows Speed!
As mentioned above, implementing these steps will take you maybe 20 minutes at the most and you’ll get that time back from a quicker Windows experience in about a month or two. Following these steps, you can easily speed up Windows 11. You can try all these methods to get the best results. You will see a significant increase in your Windows 11 performance after this. We hope you’ve found these simple Windows 11 speed-up hacks helpful. In all seriousness, by following just a few of them, you can enjoy a much faster experience when using your computer. If you do all of them, you’ll definitely see and feel a speed difference with Windows 11.
What we are witnessing from a digital warfare perspective between the Anonymous Collective and Russia is something unprecedented. We haven’t seen anything like this in the history of conflicts. It is a multi-dimensional assault on Russia and as we’ve seen them fall short of military objectives and goals, it is safe to bet that Anonymous and the collective’s approach and results have had an impact in this conflict.
Furthermore, it is also putting other world powers in a precipitous position because how are they to respond? If they tout the efforts of Anonymous are they endorsing cyber warfare? Are they endorsing Anonymous? Are they setting themselves up for an invitation to experience similar threats in the future if they get involved in a military conflict? The Anonymous Collective is impacting this Russia-Ukraine war. One could argue the results are saving lives for the Ukrainians. On the flip side, one could argue that is also causing more deaths and troop casualties on the part of Russia. All of this is fascinating to see unfold. And we’re paying close attention to what has happened in that regard.
Before we get to the details of Anonymous’ cyber attacks on Russia, who are they? Here’s an Anonymous 101 crash course. Anonymous is an internet group of cyber activists and hackers that started as a “collective” in the early 2000s. Their mission is to wage cyberwar against oppression and corruption by targeting institutions, organizations, and governments. A popular symbol of those wanting to be part of this group (or who are) is signified by wearing a Guy Fawkes mask (they do this in public and on videos).
Let’s break down how it all started. On February 24th, Russia invaded Ukraine. Many members of the international community and worldwide organizations immediately condemned Russia for these military actions. Some even went as far as to implement sanctions against Russia. As of now, these sanctions are piling up and severely impacting Russia’s economy and financial structure.
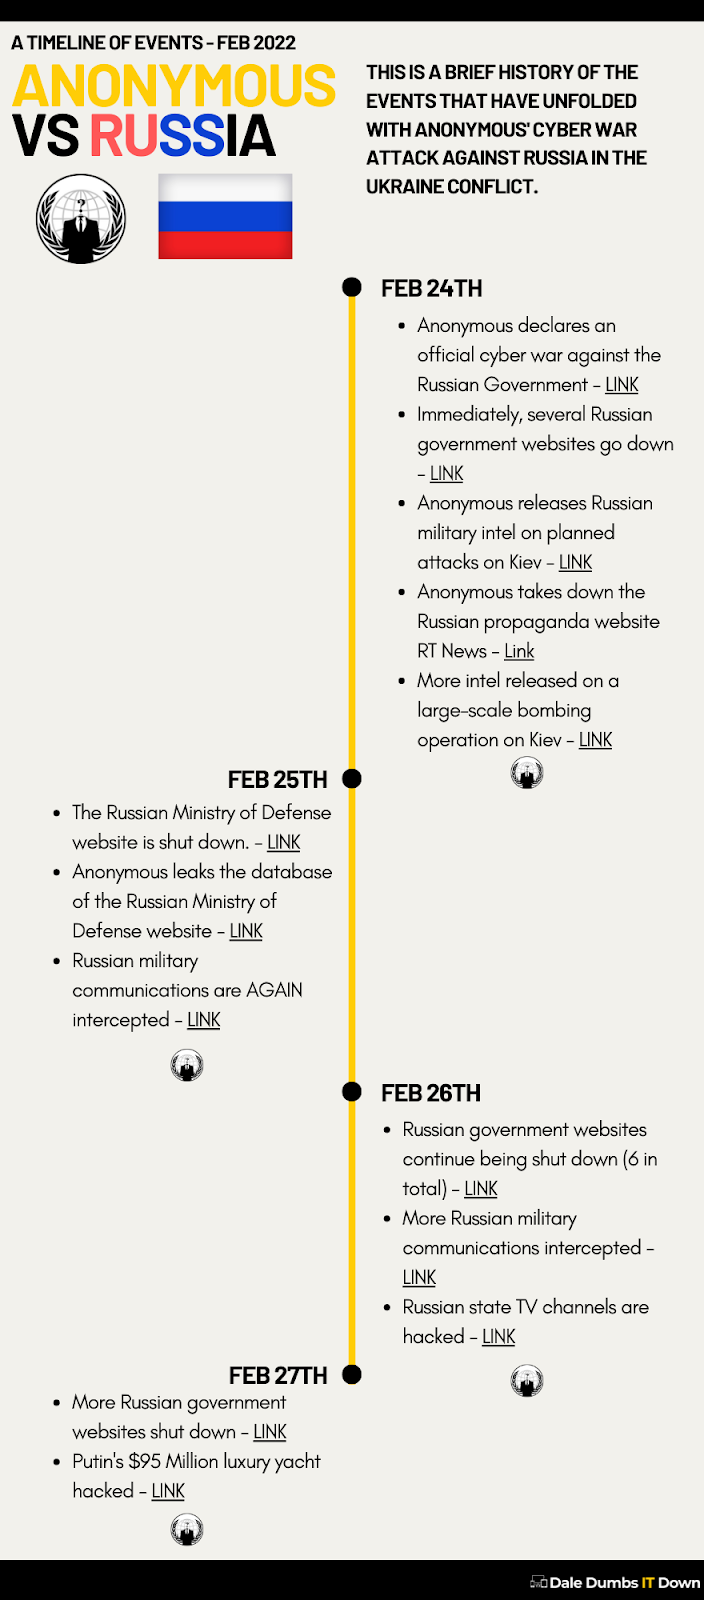
But what Russia didn’t expect was Anonymous to get involved. And what they’ve managed to do has undoubtedly affected Russia’s efforts in Ukraine. On February 24th, the Anonymous Collective officially declared a “cyber war against the Russian Government.” From there, a slew of cyber attacks penetrated Russia’s government and military including several government websites being taken down, military intel being leaked, Russian propaganda sites being taken down, and more.
It didn’t stop there either. Over the next few days, like Rocky unleashing multiple uppercuts to Ivan Drago’s chin, Anonymous continued its digital assault: more government websites taken down, Russian Ministry of Defense database leaked, military communications intercepted, and even Putin’s personal luxury yacht worth nearly $100 million was hacked to make it appear it has crashed into Snake Island. We’ve counted nearly 15 major cyberattacks as of the time of writing this article that Anonymous has successfully employed against Russia. In the context of hacking and cyber attacks, that is impressive. There are probably more that we don’t know about. Below is an infographic run down (and a downloadable PDF) of the timeline of events between Anonymous vs Russia.
How Could These Cyber Attacks Affect Russia’s Military Objectives?
These hacks into Russian websites and military databases are not insignificant either. They have affected this conflict. Here’s how these cyberattacks could potentially be impacting the Russia-Ukrainian conflict.
It Fuels Russian Dissent At Home
Anonymous Collective has infiltrated Russian news so the Russian people are fed raw, unfiltered, propaganda-free news coverage of the bloodshed and havoc their leader has unleashed on the Ukraine people. This is probably one reason we’re seeing Russians take to the streets in protest of their country’s actions and their leader’s brutal strategy.
Russia Military At Risk
Hacking military communications, servers, and intelligence puts the Russian military at a huge risk. It allows the Ukrainian military forces as well as armed civilians to know when and where the attacks are going to happen.
Perception Is Key
One thing we know is perception matters to the Russians, especially Putin. The perception right now with the conflict is that Putin has become unhinged, his efforts have been severely set back, there is unrest at home, he hasn’t accomplished the objectives in the timeframe he wanted, and the Russian economy is in a downward spiral. As it stands now, more Russian troops have died in this war than Ukrainian casualties. Approximately 5,300 Russian troops have been killed vs the reported 240 (at least) Ukrainians. Media outlets home and abroad have already dubbed this war a loss for Russia. Al Jazeera, The Guardian, and Bloomberg have all gone on to say, a loss is all but inevitable at this point.
We are in new territory with this cyber warfare. Realistically, Anonymous is a faceless threat. They have no borders. They have no assets. They have no communication center or airport to target with physical weapons of war. How do Putin and Russia retaliate? Who is Russia supposed to retaliate against? Where are they to concentrate efforts? What military action and strategy does Russia use moving forward? That’s what makes this Russia-Ukraine conflict an incredible event in history. Along with sanctions from other world powers coupled with an incessant barrage of hacks and intel breaches, Russia is literally fighting multiple wars at once. One in the physical world. Another in the digital. And both are making a major impact on history. One can only imagine the frustration on the side of Putin and the Russians because of the torment and harm these cyberattacks have caused. And one has to wonder if this is a new wrinkle in military conflicts in the 21st century and beyond.