I didn't walk away from Ring as a casual customer. I was a Ring Deep Diver, one of those people who tested beta products because I believed in where the platform was going.
For a while, that trust made sense. Ring felt polished, dependable, and easy to recommend when someone asked me what video doorbell or camera system to buy.
Then the friction started stacking up. The app became harder to live with, settings felt hidden, the monthly costs kept poking at me, and Wyze started offering the kind of value I could not shrug off. That is what turned my own ring vs wyze debate into a full switch for my home security system.
Key Takeaways
Subscription Fatigue: The primary driver for switching was the cumulative cost of monthly subscriptions, which transformed from a convenience into a recurring burden for a multi-camera setup.
App Friction: Over time, the Ring application grew increasingly complex and counterintuitive, whereas the ideal security app should function as a simple, high-speed utility.
Hardware Versatility: Wyze offers a more diverse range of affordable hardware options, making it significantly easier and more cost-effective to secure multiple zones like garages and backyards.
Local Storage Advantage: The inclusion of MicroSD card slots in Wyze devices provides a crucial alternative to cloud-only reliance, allowing users to avoid forced subscriptions for basic video playback functionality.
Choosing Your Lane: Ring remains a strong contender for those who prioritize a cohesive, polished ecosystem and professional monitoring, while Wyze excels for users seeking high-value hardware and flexible, budget-friendly security.
What Finally Pushed Me Off Ring
My switch wasn't about one bad update or one broken device. It was slower than that. A steady buildup of little annoyances followed by the bigger question I couldn't stop asking: why was I paying this much for something I used every day and enjoyed less every month?
Ring still makes decent hardware. That is not the issue. The issue, for me, was that the whole experience stopped feeling worth the premium.
### The Monthly Plan Started Feeling Too Expensive
The hardware price was only the opening bid. The real cost showed up after setup, when I wanted the features that make a security camera useful in normal life, such as recorded clips, event history, and the ability to look back when something happened.
Ring has been clear that access to cloud storage for your saved video depends on one of its paid plans, which you can see in its own Ring Protect Plan subscriptions overview. That may sound fine when you own one doorbell, but it feels different when you have a doorbell, another camera by the garage, and maybe one watching the backyard.
That is where I hit the wall. The cumulative subscription fees stopped feeling like a nice add-on and started feeling like rent on gear I already bought. Relying on cloud storage for my daily security monitoring meant that every monthly fee became harder to defend as the shine wore off the overall experience.
The App Experience Got In The Way
This part bugged me more than I expected. Ring's app used to feel clean. Open it, check the feed, review an event, done. Over time, it felt busier, heavier, and less intuitive. Things I used often took more taps, and useful settings felt buried. The entire user interface seemed to introduce more friction than necessary.
That matters because a security app should work like a light switch. You open it and get what you need. It shouldn't feel like walking through a mall just to buy a gallon of milk.
When an alert hits late at night, I don't want to hunt around. I want to know whether it is a delivery, a kid coming home, or a raccoon knocking over something on the porch. If you are staying with Ring, my own Ring doorbell settings and tips can help smooth out some of that experience. But for me, the bigger problem remained. The app simply stopped getting out of my way.
Why Wyze Won Me Over On Features and Price
I did not switch because I wanted the cheapest box on the shelf. Cheap by itself does not impress me. I wanted more value per device, and that is where Wyze kept landing punches. The surprise was not just that Wyze cost less, but that these affordable security cameras gave me what I needed without making me feel like I had to pay extra to unlock normal device behavior.
Wyze Gave Me More Camera Options for Less Money
One thing Wyze did right for my setup was variety. Indoor cameras, outdoor models, battery options, and pan-and-tilt models provided enough range that I could place cameras where they made sense instead of where my budget allowed.
That matters more than people admit. Home security is not just one front door and a dream. It is the side gate, the garage, and the back window. When looking at the ring vs wyze debate, current 2026 price comparisons show what I felt in my wallet: Wyze makes it easier to expand coverage without turning every extra camera into a financial debate. I could finally prioritize camera placement, a wide field of view, and eliminating blind spots without punishing my bank account.
The Feature Set Felt Surprisingly Strong for the Price
This is where Wyze stopped being the cheaper option and started looking like the smarter buy for my house. On several models, Wyze offers 4K resolution, color night vision, and reliable motion detection that I can actually trust.
I also found that having a MicroSD card slot was a game changer. Being able to utilize local storage for continuous recording means I do not have to push every single video clip to the cloud. While Wyze does offer a subscription service called Cam Plus for those who want extra features, I never felt forced into it just to get basic functionality.
Even on the doorbell side, the value gap stood out. A solid doorbell comparison from SlashGear points to the same things that got my attention: better local storage options, intelligent motion detection, and a high-quality video doorbell experience that feels premium without the constant pressure to subscribe. Is Wyze perfect? No. But perfection was not the bar. Useful features at a sane price was the bar, and Wyze cleared it for me.
How the Setup, Daily Use, and Smart Home Fit Compared
Specs are nice, but daily life is what counts. That is where this switch made sense fastest.
Setup Was Easier to Accept When the Price Was Lower
I do not think either company owns the crown for perfect setup every single time. Wi-Fi hiccups happen, pairing can be annoying, and mounting wireless cameras or battery-powered cameras always takes a little trial and error. That is normal.
The difference is how much patience I have when it happens. If a premium-priced device gives me trouble, I feel it right away. I start asking why I paid so much to troubleshoot something that should have been simple. With Wyze, small setup hiccups were easier to forgive because I was not already irritated by the price tag and the subscription math.
Building out more cameras felt lighter. That is a small thing on paper, but in real life, it is not small at all.
Wyze Fit My Smart Home Needs Better Than I Expected
I assumed Ring would still win on day-to-day polish because it had the head start in my life. Instead, Wyze fit my routine better than I expected. Checking a feed felt quick, and local storage gave me options. The cameras offered solid smart home integration by playing nicely with Amazon Alexa and Google Assistant, so I did not feel boxed into one giant ecosystem.
That mattered more than branding. I do not buy smart home gear so I can admire the logo. I buy it so I can glance at a feed, answer a doorbell, and move on with my day.
For parents, geeks, and anyone who lives in their notifications, that difference is easy to feel. If a product interrupts your routine, you notice. If it slips into the background and does its job, you notice that too.
The Tradeoffs I Noticed and Who Should Still Pick Ring
I do not think Ring is a bad choice. I simply think it stopped being the right choice for me.
Ring still has real strengths. If you want a video doorbell, professional monitoring, deeper Amazon Alexa ties, and a more established security brand, Ring has an edge. Their catalog of floodlight cameras and wireless cameras is extensive, and the ecosystem remains the best argument in their favor. Broader 2026 brand comparisons keep landing in a similar place, noting that Ring makes more sense when you want a fuller security package and are willing to pay for it.
However, Wyze has its own tradeoffs. While I appreciate the local storage options, the software is not flawless. When comparing hardware, you should know that the Wyze cameras have the best field of view and the weather resistance that's I've seen. While Wyze offers person detection, you may find the motion detection and smart detection settings require more tinkering to get right. You are buying value, not luxury, which is important to remember if you want the most mature software possible.
The biggest technical differences usually come down to recording length and the dreaded cooldown period on free tiers. If you are tired of subscription fees, Wyze is a great alternative, but Ring still provides a more seamless experience for battery-powered cameras and floodlight cameras that integrate well with both Amazon Alexa and Google Assistant.
My takeaway is simple. If your priority is a budget-friendly setup with flexible smart detection, Wyze is hard to ignore. If your priority is a complete security ecosystem with professional monitoring and you are comfortable with the monthly costs, Ring still has a lane.
Frequently Asked Questions
Can I use Wyze cameras without paying a monthly subscription?
Yes, you can use most Wyze cameras without a subscription. By utilizing a MicroSD card for local storage, you can record events and view footage without needing to pay for the optional Cam Plus service.
Does Ring offer any way to avoid monthly fees?
Ring restricts almost all cloud storage and event history features to their paid subscription tiers. While you can still view a live feed for free, you will lose the ability to save or review past clips if you do not pay for a Ring Protect plan.
Which system is better for integrating with smart home assistants?
Both systems work well with Amazon Alexa and Google Assistant, though Ring has deeper, native integration with the Amazon ecosystem. Wyze is a flexible, platform-agnostic choice if you want your security gear to play nicely with various smart home hubs without being locked into a single premium brand.
Is the setup process for Wyze more difficult than Ring?
Generally, both systems involve similar setup steps like connecting to Wi-Fi and mounting hardware, which can occasionally involve minor troubleshooting. Most users find the setup process comparable, though the lower price point of Wyze makes those occasional setup hiccups feel much more tolerable.
Conclusion
I left Ring after years of being one of its biggest supporters, and that is exactly why the decision means something to me. This was not one bad week. It was a long stretch of rising costs, a weaker app experience, and the feeling that I was paying more while enjoying the product less. When looking at the Ring vs Wyze debate, it is clear that security gear should feel useful, not annoying or overpriced.
My move to Wyze came down to lower long-term cost, stronger value, and day-to-day use that fits my home better. Whether you prioritize advanced smart features or simply want a reliable setup, your choice depends on your specific needs. If you want a polished ecosystem built around a premium video doorbell and do not mind the monthly bill, Ring may still be your best choice. However, if you want a flexible home security system that offers more hardware for your money and the option to add Cam Plus for enhanced detection, Wyze is where I landed, and I have not looked back.
Ninety days is long enough to get past the honeymoon phase. It's also long enough to notice which AI tool keeps helping and which one keeps making me work harder. In this article, I'll share my experience with Claude vs ChatGPT after using both for three months.
I'm not a coder. My main use cases are writing, content planning, research help, and day-to-day productivity. So when I moved a big chunk of my workflow from ChatGPT to the Claude AI chatbot by Anthropic, one of the leading large language models, I had simple goals: better writing, less rewriting, stronger memory, and fewer prompt battles. Yes, I rage "chatted" with ChatGPT many a time...chewed up a bunch of tokens, but I think I felt better afterward! 😉
This is my real-world review for non-coders, creators, tech folks, and busy people who want a personal AI assistant that feels useful, not needy.
Key Takeaways
Claude nails writing tone, style, and instructions better than ChatGPT, slashing rewrite time from 15-20 minutes to just a line or two.
Projects, memory, and artifacts cut re-explaining and let non-coders build practical tools like content calendars without coding.
Connectors make research, files, and apps seamless, turning Claude into a workflow hub for daily productivity.
Rate limits hit hard mid-flow, and no image generation means keeping other AIs, but the core wins make it my main assistant.
What Got Better Almost Right Away
The switch to the Claude AI chatbot from Anthropic felt noticeable within the first week. I didn't need a month of careful testing to spot it. Claude fit my work faster, mostly because it gave me fewer answers that sounded polished but off.
### Claude Writes More Like I Do, So I Spend Less Time Fixing the Tone
This was the biggest win, by far. Claude follows tone, style, and word-count instructions better than ChatGPT did for me, thanks to its complex reasoning powered by the transformer model architecture. Claude Sonnet, as a mid-tier model, performs especially well for these tasks. It stays in paragraph form when I ask for paragraph form, and it's less likely to drift into generic AI copy or random bullet points.
That mattered because I was tired of spending 15 to 20 minutes cleaning up outputs that were technically fine but didn't sound like me. With Claude, I often change a line or two and move on. That's a huge difference when you write a lot.
Custom styles and saved preferences helped, too. Once I fed it enough examples through Claude Pro, the voice got closer to mine. I'm not saying it reads my mind, because no AI does, but it misses by inches instead of miles. That lines up with broader testing on the best AI tools for writing in 2026, where Claude keeps showing up as a strong pick for long-form work.
The real payoff is simple: I spend more time publishing and less time rewriting.
Projects and Memory Cut Down the Need to Re-Explain Everything
The second win was the expanded context window. My project-style workspaces let me keep a style guide, recurring instructions, and draft material in one place. New chats didn't start cold, and that shaved off a lot of setup friction.
Memory helped even more. By April 2026, Claude's memory features are more widely available, and being able to review or edit those memories matters. Over time, Claude started carrying my preferences from one chat to the next, so I didn't have to restate the same rules every morning.
For busy people, that's the difference between an assistant and a goldfish. If you follow where this is heading, my earlier piece on AI agents changing workflows in 2025 gives useful context for why memory and tool use matter so much in daily work.
The Features That Made Claude Stick in My Daily Workflow
A lot of AI tools are fun for a week. Fewer become part of the workday. The Claude AI chatbot from Anthropic stuck because a few features helped me do real tasks, not just generate text.
The Artifacts Feature Helped Me Build Useful Tools Without Feeling Like I Needed to Code
I'm still not using Claude as a hardcore coding tool. Yes, I'm experimenting with my own script for a virtual lab setup using Claude Code as a coding assistant, but that's not why I stayed. I stayed because Claude made it easy to build practical little helpers inside the chat.
I've used those workspace-style outputs to make rough content calendars, project trackers, planning docs, and simple visual layouts. The point isn't that they're perfect. The point is that I can build something useful without feeling like I need a computer science degree first. Claude is a top choice for software development tasks, even for non-coders.
That confidence matters for non-coders. When a tool helps me make a thing I can use right now, it earns a spot in my workflow. In that area, Claude feels more like a calm workbench than a chatbot with stage fright.
Connectors Made Research and File Work Much Easier
Connectors are where Claude started feeling less like a writing bot and more like a work hub. Pulling in context from files and apps cuts down on tab switching, copy-pasting, and the usual hunt for "where did I save that doc?" These integrations enable agentic AI workflows, making Claude Sonnet a versatile tool for daily work.
In 2026, Claude's app connections have expanded a lot, especially through MCP-based integrations. That means it can work with tools like Google Drive, Gmail, Slack, GitHub via command-line interface, and a long list of others. For me, that helps with content drafts, scattered notes, research docs for visual analysis and data insights, plus web search capabilities and general task wrangling.
For this site's crowd, the benefit is wider than writing. If you work in tech, security, or training, connected context saves time and reduces mental clutter. I see the same pattern when testing AI tools safely in lab setups, which is why I care so much about testing AI agents without public ports. A connected AI can be helpful, but it also needs boundaries.
That broader trade-off also shows up in this Claude vs. ChatGPT 2026 comparison, which echoes what I've felt firsthand: Claude is strong when the job involves long context, writing, and multi-step productivity.
What Still Frustrates Me After 90 Days
The switch was worth it, but as I've said, it's not perfect. A few pain points still annoy me, especially when I'm in the middle of real work and don't want surprises.
### Rate Limits Can Break My Flow at the Worst Time
Claude Opus is great, but it can chew through limits fast. Long chats, heavier tasks, and extended thinking all add up, and that becomes a problem when I'm deep into a project and burning through tokens.
For simpler tasks, I switch to Claude Sonnet or Claude Haiku as a faster alternative to save tokens. The bigger context windows in Claude Opus are nice. Still, practical usage limits tied to compute capacity can be the real bottleneck. When I hit a wall mid-workflow, it feels like someone pulled the chair out from under me.
These compute capacity limits are a trade-off for Anthropic's strong focus on AI safety. Features like Constitutional AI and reinforcement learning from human feedback ensure AI alignment, delivering Claude AI chatbot's consistent natural language quality. Built on advanced machine learning techniques, Claude Opus stands out among large language models as ideal for enterprise users who prioritize reliability and AI safety.
No Image Generation Means I Still Have to Keep Other AI Tools Around
Claude AI chatbot still isn't my only AI tool because I need visuals sometimes. When I want quick image work, or even certain throwaway tasks, I still hop over to ChatGPT or Grok.
That breaks the flow. It also means I keep a personal routing system in my head, this tool for writing, that one for images, and another one for quick random stuff. On a paid plan, that's annoying. For me, though, it's not a deal breaker.
Claude won me over because it's more consistent with where I spend most of my time, writing, planning, researching, and doing daily work. Its superior natural language handling, memory, project-style context, and connectors keep getting more useful the longer I use them.
I'm still not using Claude Code or it as a hardcore coding machine. But for the work I actually do, this excellent AI assistant fits me better than ChatGPT right now. It excels in complex reasoning and software development planning. The downsides are real, especially rate limits and no built-in image generation, but I'm not going back as my main AI assistant.
Frequently Asked Questions
Is Claude better than ChatGPT for writing and productivity?
Yes, by far! Claude follows tone, style, and word-count instructions more reliably, especially with Claude Sonnet, reducing the need for heavy edits. Memory and projects carry preferences across chats, minimizing setup time. For non-coders focused on content and planning, it's a clear upgrade over ChatGPT's generic outputs.
What makes Claude's Artifacts and Connectors useful for daily work?
Artifacts let you create interactive tools like project trackers or calendars right in chat, no coding needed. Connectors pull in files from Google Drive, Gmail, Slack, and more, cutting tab-switching for research and tasks. They make Claude feel like a calm workbench for real workflows, not just text generation. I'll do another post about using Cowork, which is a game-changer!
Are there any frustrations with using Claude after 90 days?
Rate limits on Claude Opus can interrupt deep work, forcing switches to lighter models like Haiku. No built-in image generation means hopping to other AIs for visuals. Still, Anthropic's safety focus ensures reliable, aligned outputs that outweigh these for most users.
Who is Claude AI chatbot best suited for?
Non-coders, writers, creators, and busy pros doing content planning, research, and productivity tasks. It shines in long-context work, complex reasoning, and multi-step projects. Tech folks experimenting with agents will appreciate the connectors and memory, too.
OpenClaw (formerly Clawbot and Moltbot) keeps popping up in my DMs. Friends, family, parents in my neighborhood, and security folks I work with all ask the same thing: "Is it safe to run an AI assistant that can actually do stuff?" Here's my honest take on OpenClaw security and secure deployment: OpenClaw is impressive because it is an autonomous AI agent that turns a chat message into real actions. But anything that can touch files, browsers, and commands deserves grown-up security. "Convenience is great until it becomes an open door".
So in this post, I'm going to share how I test OpenClaw in a way that keeps it off the public internet. I'm also going to explain why I personally like Twingate for this, because it lets me keep ports closed while still getting secure remote access.
What OpenClaw Is Great At, And Why That Also Makes It Risky
OpenClaw is a self-hosted AI agent. In plain English, that means it's a "do-er," not just a "talker." You chat with it in an app, and it can run skills that perform real tasks, like updating files, calling APIs, or automating a browser session.
When I say "agent," I mean software that can take a goal, plan steps, and then act. When I say "skills," I mean plug-in abilities you enable, like file access or shell commands. If you want a deeper, plain-language rundown of what agents are and why they matter, I wrote AI Agents Explained for 2025 Workflows.
That power is also the risk, especially when considering OpenClaw security and secure deployment.
If OpenClaw can run tools, then a bad prompt, a poisoned skill, or a stolen key can turn "helpful assistant" into "tiny intern with admin access and no fear." The most common threats aren't sci-fi. They're the same boring problems we've always had, just with better automation and added runtime risk:
Prompt injection: Trick the agent into ignoring your rules and doing something unsafe via untrusted input.
Prompt injection through authentication bypass: An attacker crafts input to override safeguards and access restricted actions.
Stolen API keys: If someone gets your model tokens, they can burn money or pull data.
Unvetted skills: A skill can be buggy, over-permissioned, or flat-out malicious, enabling remote code execution or data exfiltration.
Accidental exposure: One port-forward, one rushed firewall rule, and you have exposed instances vulnerable on the internet.
My rule: treat OpenClaw like shadow AI that can touch real systems in your home network, because it can. Testing safely beats being fearless.
The Two Ways People Get Burned: Public Exposure And Over-Permissioned Tools
Most "I got wrecked" stories fall into two buckets.
First, public exposure. Someone opens an inbound port for convenience. Maybe it's SSH, a dashboard, or the OpenClaw gateway itself. The thought process is always the same: "It's just for a day." Then life happens, the port stays open, and scanners find it.
Second, over-permissioned tools. People enable the scary skills because they're fun. Shell access, full disk read and write, browser control, and broad network reach. Then they install a skill they didn't review, or they paste something into chat that the agent interprets in a surprising way.
Here's the cause and effect in one sentence: the internet will eventually talk to your agent, and your agent will eventually do what it's allowed to do.
If you want to see how the broader community is thinking about hardening, I've skimmed a few guides, and the most practical one I've seen is OpenClaw hardening steps. I don't agree with every choice, but the defensive mindset is right.
My "Safe Sandbox" Setup For Playing With OpenClaw
When I test OpenClaw (or, for that matter, any new tool), I focus on security and secure deployment. I build in a sandbox mode that assumes something will go wrong. Not because I'm pessimistic, but because it's cheaper than cleaning up later.
My baseline looks like this:
I run OpenClaw on a spare machine, a VM, or a container. I keep it away from my personal laptop files, family photos, password vault exports, and work credentials. "If I wouldn't hand it to a stranger at a coffee shop, I don't mount it into the agent environment". This setup works well for ecosystem components like OpenClaw.
Next, I keep the OpenClaw gateway bound to localhost. That's a big one. Localhost means it only listens to itself, not your whole network, and definitely not the internet. If a service must be reachable, I want it reachable through an access layer, not by opening a port and hoping for the best.
I also keep persistent memory and logs locally while I'm learning. I don't push agent logs into random cloud dashboards on day one. Logs can contain prompts, tokens, filenames, and other "oops" data you did not mean to share.
Containment First: VM Or Container, Limited File Access, And No "God Mode" Accounts
Containment is me asking, "If OpenClaw gets tricked, what's the blast radius?"
So I start with virtual machine isolation or a container and a dedicated non-admin user. I avoid running anything as root unless I have a clear reason. For file access, I prefer narrow mounts. If the agent needs a folder, it gets one folder, not my whole home directory.
I also keep risky tools disabled at first. Shell execution, shell commands, broad file search, and browser automation are powerful, but they're also easy to misuse. I turn them on only when I need them, and I turn them back off when I'm done testing that feature.
Gotcha: the "cool demo" permissions are almost never the "safe default" permissions.
Credential Hygiene: API Keys, Tokens, And Skill Review Without Paranoia
Secrets are where most lab setups get sloppy.
I don't hardcode API keys, SSH keys, or OAuth credentials in plain-text files next to the app. Instead, I use environment variables, or a secrets manager if the setup warrants it. I also keep separate keys for lab vs production. That way, if my test box gets popped, the attacker doesn't inherit my real-world access.
Rotation matters too. If I've been experimenting for a week and sharing screenshots, I assume a key might have leaked. Then I rotate it and move on.
Skills get a quick review with the Skill Scanner (https://clawned.io/), especially those pulled from ClawHub. I'm not doing a full code audit every time, but I do skim for obvious red flags: surprise network calls, broad file permissions, and anything that shells out without guardrails. Info-stealers love config folders, so I treat that directory like it's sensitive.
For a more "setup-focused" angle (especially if you're still learning the moving parts), this OpenClaw setup guide is useful background reading.
How I Secure Remote Access With Twingate, So I Don't Need Public Ports Or A VPN
At some point, you'll want to use OpenClaw when you're not at home. That's where people get tempted to punch a hole in the firewall.
I don't do that!
Instead, I use Twingate (https://www.twingate.com/) as my preferred way to reach internal resources without exposing them, ensuring OpenClaw security and secure deployment. The core idea is simple: authenticate and authorize every connection, and keep the private service private. From my perspective, the big win is no inbound firewall rules. The connector makes outbound connections, providing network isolation so I'm not publishing a new target to the world.
This is also why I don't start with a traditional VPN like ExpressVPN for this use case. VPNs can be fine, but they often feel like giving someone a wristband for the whole venue. For a more general comparison, I've got thoughts on that in best VPNs for secure remote access, but my OpenClaw stance is tighter access, smaller blast radius.
The Simple Mental Model:Localhost Gateway, Outbound Connector, And Policy-Based Access
I think about it like a locked door with a guest list.
OpenClaw stays on localhost with gateway binding (for example, 127.0.0.1:18789, but use whatever your OpenClaw config sets.) A Twingate Connector sits inside my network and phones out. My devices use the Twingate Client, and I only allow access to the specific resource and port I choose, leveraging this gateway binding for secure localhost exposure.
In Twingate terms, I'm working with a few building blocks:
Connector: The piece that lives in my network and creates outbound connectivity.
Client: The app on my phone or laptop that proves it's me.
Resources: The internal things I want to reach, like the OpenClaw gateway that implements the Model Context Protocol for agent communication.
Policies: The guest list, which says who can access what, and under what conditions.
Because nothing has to listen on the public internet, scanning bots can't even knock.
The Policies I Use: Groups, MFA For Anything Serious, And Logging I Actually Review
Policies are where the safety really shows up.
I assign access by group instead of building one-off exceptions, effectively creating an allow-list. For anything tied to sensitive data, I require MFA. If OpenClaw is allowed to touch even mildly important systems, MFA is non-negotiable. Even with this setup, remote access doesn't solve issues with untrusted input.
Then I turn on logging and actually look at it. I'm not staring at dashboards all day, but I do check for weird access patterns, like odd hours, unknown devices, or repeated connection attempts that don't match my habits. I also monitor Connector health, because availability signals can double as security signals. If the Connector flaps, I want to know why.
If I'm going to run an AI agent, I want receipts!
Conclusion
OpenClaw is a powerful autonomous AI agent, which is why I treat it as a tool that can interact with real systems. My three guardrails stay the same: isolate the environment, minimize permissions and credentials to prevent risks like credential dumping, and avoid public exposure by using Zero Trust access (Twingate is my go-to for that).
This guide on OpenClaw security and secure deployment emphasizes starting small, keeping risky skills off at first, and proving your setup is safe before you expand it. If you're running OpenClaw already, I'd love to hear what you're using it for, and what part you want to lock down next.
I've got my PEN....I've got my Pineapple...oh no, it's stuck in my mind. For those that haven't seen this video with over 5 million views, go ahead and check it out: https://www.youtube.com/watch?v=NfuiB52K7X8. Now you can live my Pen Pineapple Apple Pen hell. Just kidding,..kind of . This song comes to my ADHD brain everytime I think or talk about one of my favorite tools: The WiFi Pineapple.
Lets jump right into setting up this bad boy (more posts coming on how to use it in different scenarios). Navigating the Setup Wizard: Setting up your WiFi Pineapple
So, you've got your hands on a WiFi Pineapple Mark VII, and now it's time to dive into setting it up. Whether you're a seasoned cybersecurity pro or just starting out, getting your WiFi Pineapple up and running is the first step to exploring its powerful capabilities. In this guide, we'll walk you through the essential steps of setting up your WiFi Pineapple and navigating the Setup wizard.
Getting Started: Connecting to your WiFi Pineapple
Before we delve into the setup process, let's ensure you're connected to your WiFi Pineapple. Once you've connected and it's fully booted, you can access the WiFi Pineapple Stager at http://172.16.42.1:1471. Remember, the port number is crucial here; the WiFi Pineapple uses port 1471 instead of the default HTTP port. The WiFi Pineapple ships with a streamlined firmware called the stager, allowing for easy updates to the latest firmware right out of the box. This approach ensures you're always equipped with the most recent features and enhancements.
Updating Firmware Over-The-Air (OTA)
Updating your WiFi Pineapple's firmware over-the-air is a straightforward process. Here's how it's done:
Verify WiFi Pineapple Presence: Confirm your connection to the WiFi Pineapple by following the on-screen instructions.
Connect to an Access Point: Establish an internet connection by connecting to a known Access Point. This allows the WiFi Pineapple to download the latest firmware automatically.
Automatic Firmware Download: Once connected, the latest firmware will be fetched and flashed to your device automatically.
Wait for Flashing to Complete: The initial flash and boot process may take some time (around 10-15 minutes). Patience is key during this phase.
Chrome Considerations: Note that some versions of Chrome may report the page as unresponsive post-update. If this occurs, simply close the tab and reopen http://172.16.42.1:1471 to resume setup.
Manual Firmware Upload
Alternatively, you can opt for a manual firmware upload if OTA isn't suitable for your situation. Here's how:
Download Firmware: Obtain the latest firmware from the Hak5 Download Portal, ensuring it matches the SHA256 sum listed on the website for integrity verification.
Upload to WiFi Pineapple: Navigate to the Network page and select the "upload a firmware instead" option. Upload the downloaded firmware, which will then be checked and flashed to your WiFi Pineapple.
By following these steps, you'll have your WiFi Pineapple up and running with the latest firmware, ready to explore its full potential.
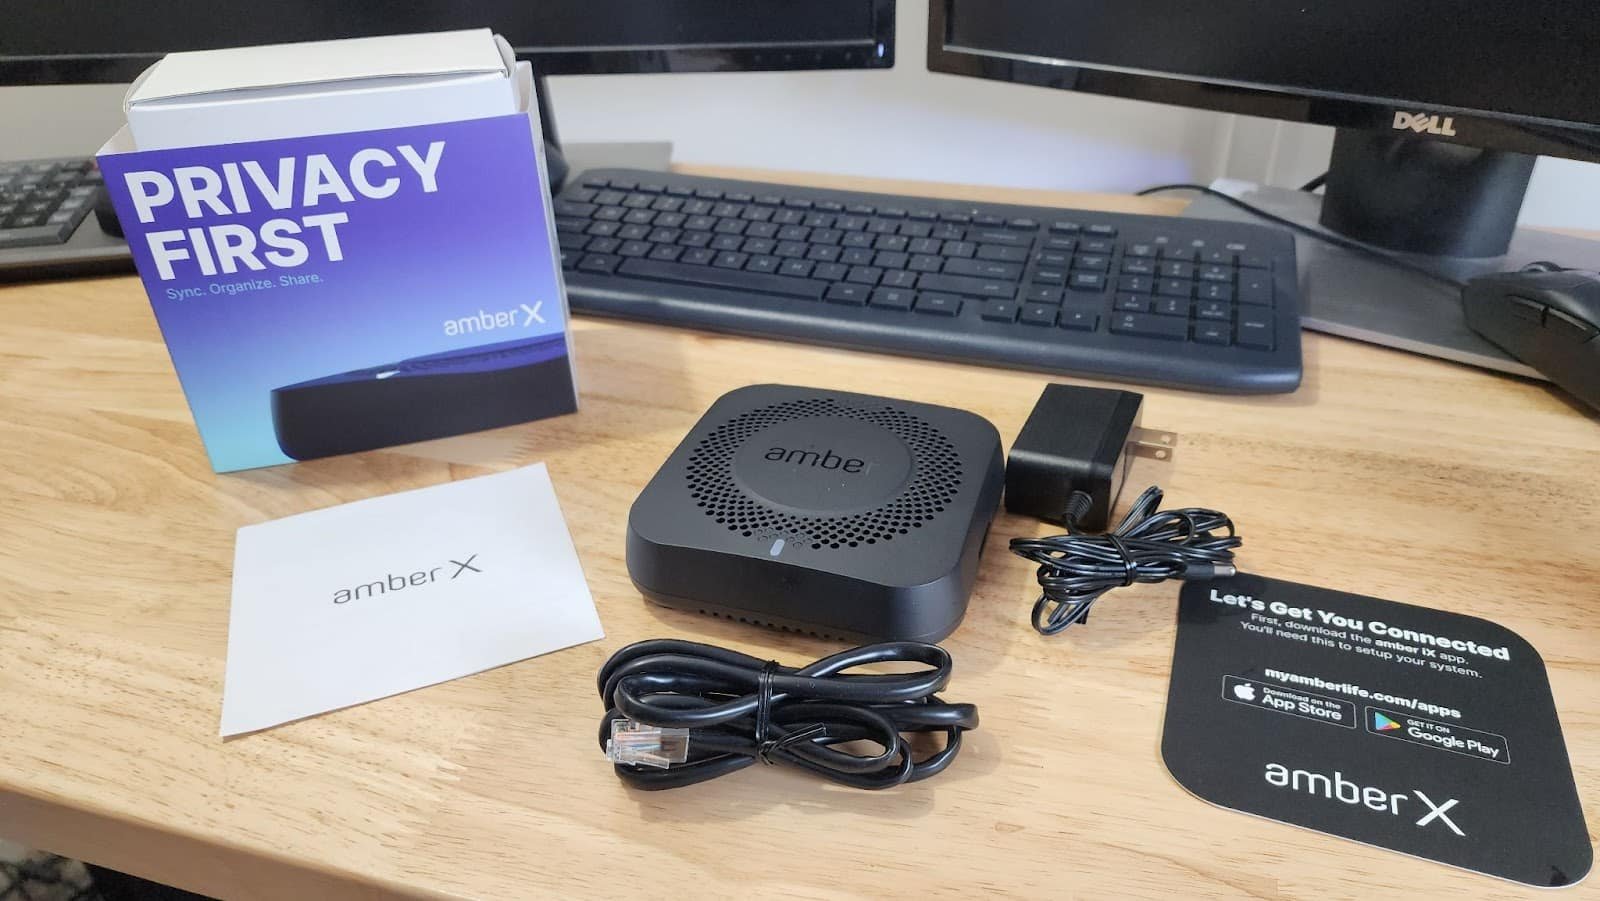
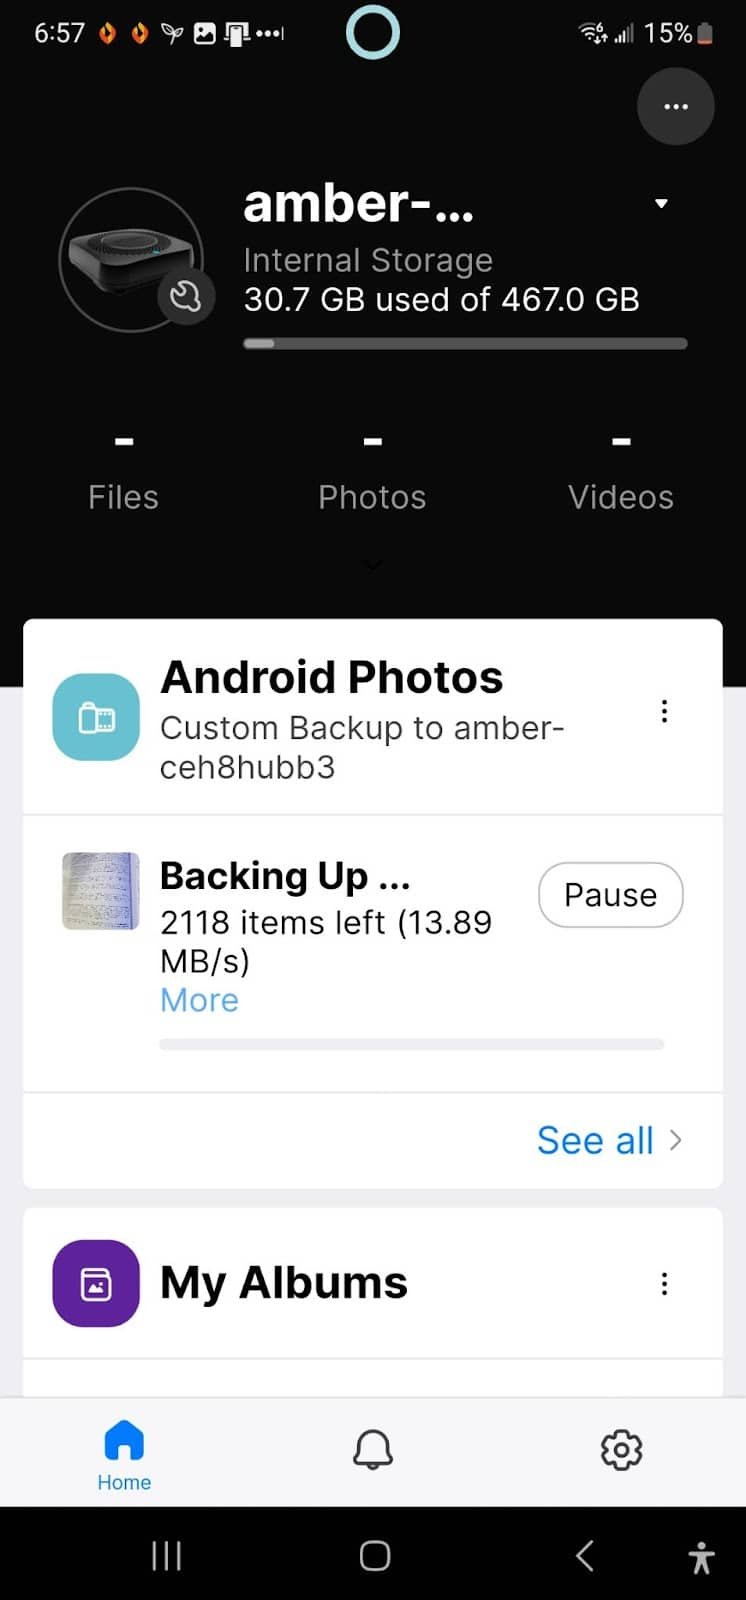
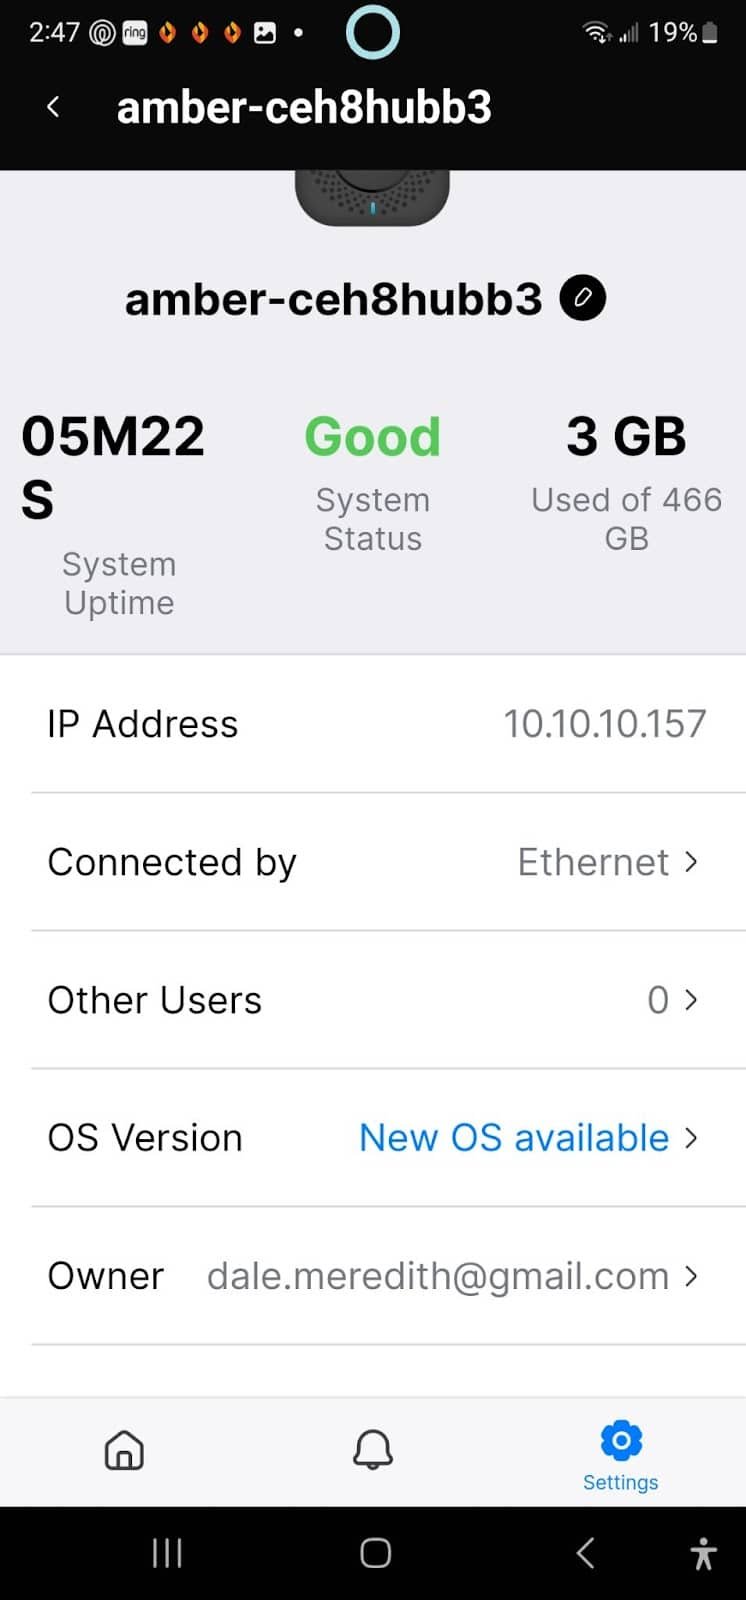
In this digital age, we're all searching for that ideal photo storage solution. Google Photos, for many, has been a trustworthy companion, yet its limitations often spark a quest for alternatives. So, let's examine a potential challenger, the Amber X, priced at $249, and see if it ticks all the right boxes.
A Journey into Amber X
Setting up a Network Attached Storage (NAS) device can feel like wandering into a labyrinth. I personally run a Synology (https://synology.com) NAS with a crap load of drives for not just my photos, but all kinds of data storage and services (virtual machines, docker machines, basically a bunch of nerd stuff). But that setup cost me well over $2,000 for my 35TB of digital hoarding. (We’ll be looking at their Pro device in another post…I’m kind of giddy thinking about it).
But here's the game-changer: Amber X. This device emphasizes user-friendliness and simplicity, shedding the complex layers that usually accompany such setups. Now I should specify that LatticeWorks did reach out to me and sent me these units for free. But if you all know me, you know I won’t pull any punches. My personal pet peeve is reading reviews that are afraid to just be upfront and honest about the product. So, here we go.
Getting started with Amber X involves four straightforward elements: a power cord, a Bluetooth connection, a WiFi connection, and your mobile device. Now, get ready to be guided through the whole setup process by the super user-friendly Amber iX app. Whether you're team iPhone, Android, Windows, or Mac, it's got you covered. So sit back, relax, and let Amber iX lead the way, turning the installation journey into a piece of cake!
Like all reviews, we have to cover what’s under the hood, strap in because we're diving into the nuts and bolts of this bad boy. Trust me; these specs are impressive!
Ports? More like Porty Party!
Amber X comes loaded with multiple port options. You have an SD Card Reader for all your photo offloading needs. There's also an HDMI 2.0 4K Output for when you want to showcase your media in high resolution. Your Amber X is also equipped with a Gigabit Ethernet Port, a USB 3.1 Gen 1 Type-A port for those of us who still love our USBs, and a 12V/2A DC Power port to keep the party going.
Wireless Wonder
Amber X rocks the wireless world with 802.11ac 2x2 WiFi and Bluetooth for System Setup. No more cable spaghetti and the 2x2 means that it has two antennas supporting two data streams.
Storage, Storage, and More Storage
With a whopping 512GB High-Speed SSD Internal storage, Amber X is like a digital treasure chest. And guess what? You can expand this with USB 3.1 drive! It supports (hang on to your hats, folks) 2TB via SSD and up to 12TB via an external hard drive (like this one here on Amazon https://amzn.to/3oY4yfL). That's what I call generous!
Processor and Memory? Lightning Fast!
The Amber X comes armed with a 64-Bit 6-Core ARM® Cortex® Processor and 2 GB DDR4 RAM. Dumbed down, Amber X is a lean, mean, speed machine.
Size and Weight
At 4.9 in x 4.91 in x 1.5 in and weighing just 0.66 lbs, Amber X is compact and super portable. It's like carrying a feather that holds half your digital life!
Software and Security
Amber X is powered by its very own Amber OS. Your data is locked tight with Encrypted Data Transfer / Transport using TLSv1.3 and OpenSSL 1.1. It also offers Configurable Disk Encryption with dm-crypt AES-XTS cipher. Basically, Amber X is a freakin Fort Knox for your data.
Media Output – The Power of Three
Here's where it gets interesting. Amber X supports Chromecast Output, Chromecast Ultra Output, and DLNA Output. The video formats supported include .avi, .mkv, .mov, and .mp4. In terms of video codecs, it supports H.264, VP8, and even H.265, VP9 for Chromecast Ultra and DLNA Output.
You can view image formats like .bmp, .gif, .jpeg, .png, and .webp. For you audiophiles, it supports .aac, .mp3, .mp4, .wav, and .webm formats. And here's the cherry on top: you get bit rates of 5Mb/s with 2.4Ghz WiFi and a whopping 30 Mb/s with 5Ghz WiFi. That's a lot of horsepower under Amber X's sleek hood!
So, that's the lowdown on Amber X's specs. It's pretty clear that Amber X isn't just a pretty face; it's a power-packed performer that can take on anything you throw at it!
There are so many features that we’re going to have to do several articles in the future.
Setup: Easy Peasy, Lemon Squeezy
Let's get your shiny new device up and running without breaking a sweat! Sidebar: I’ll be using an Android device for my screenshots.
To start the setup, you’ll need to first download the Amber iX app from your app store.
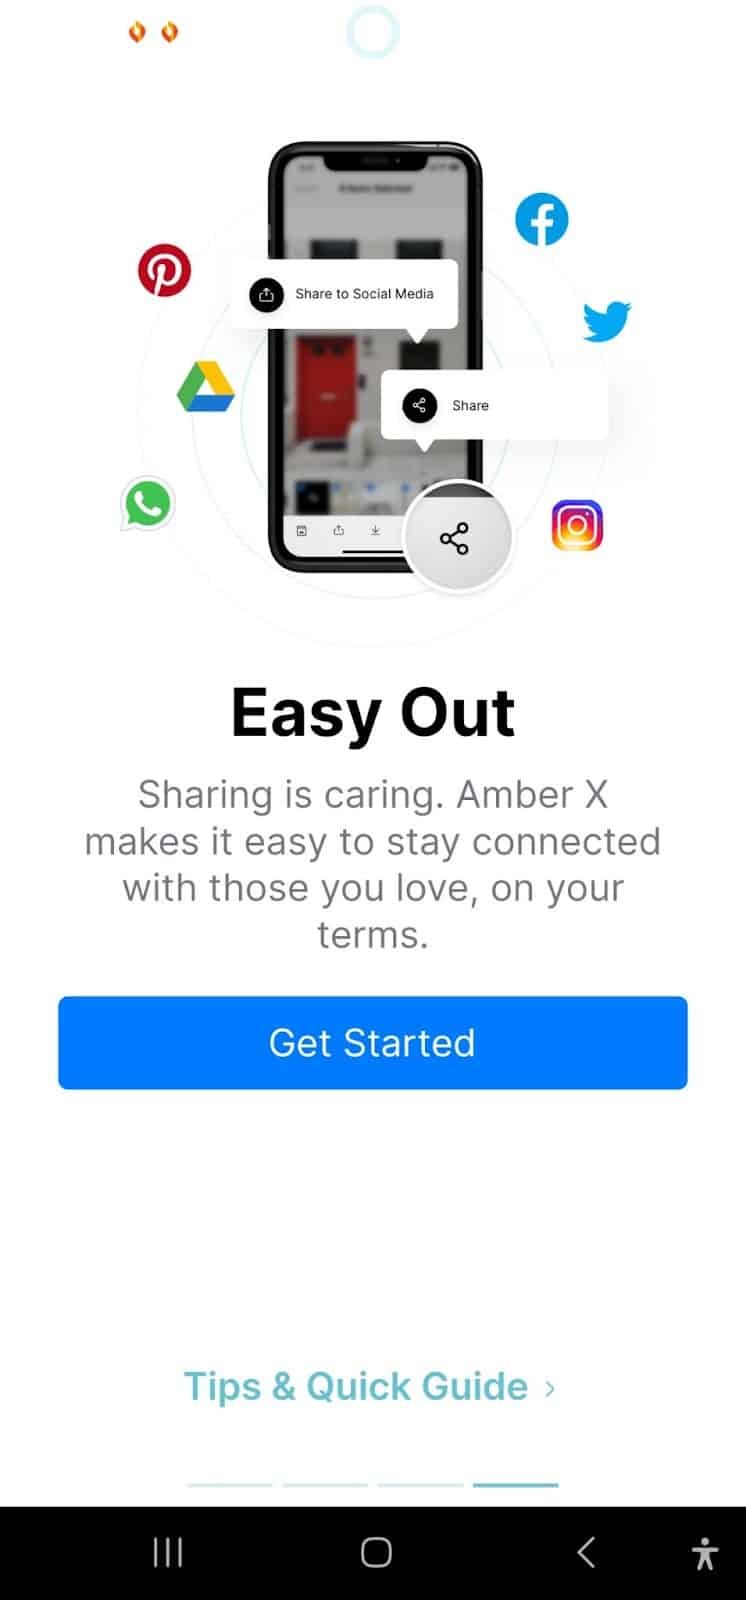
You’ll then be presented with a couple of feature screens to remind you how awesome this device is.
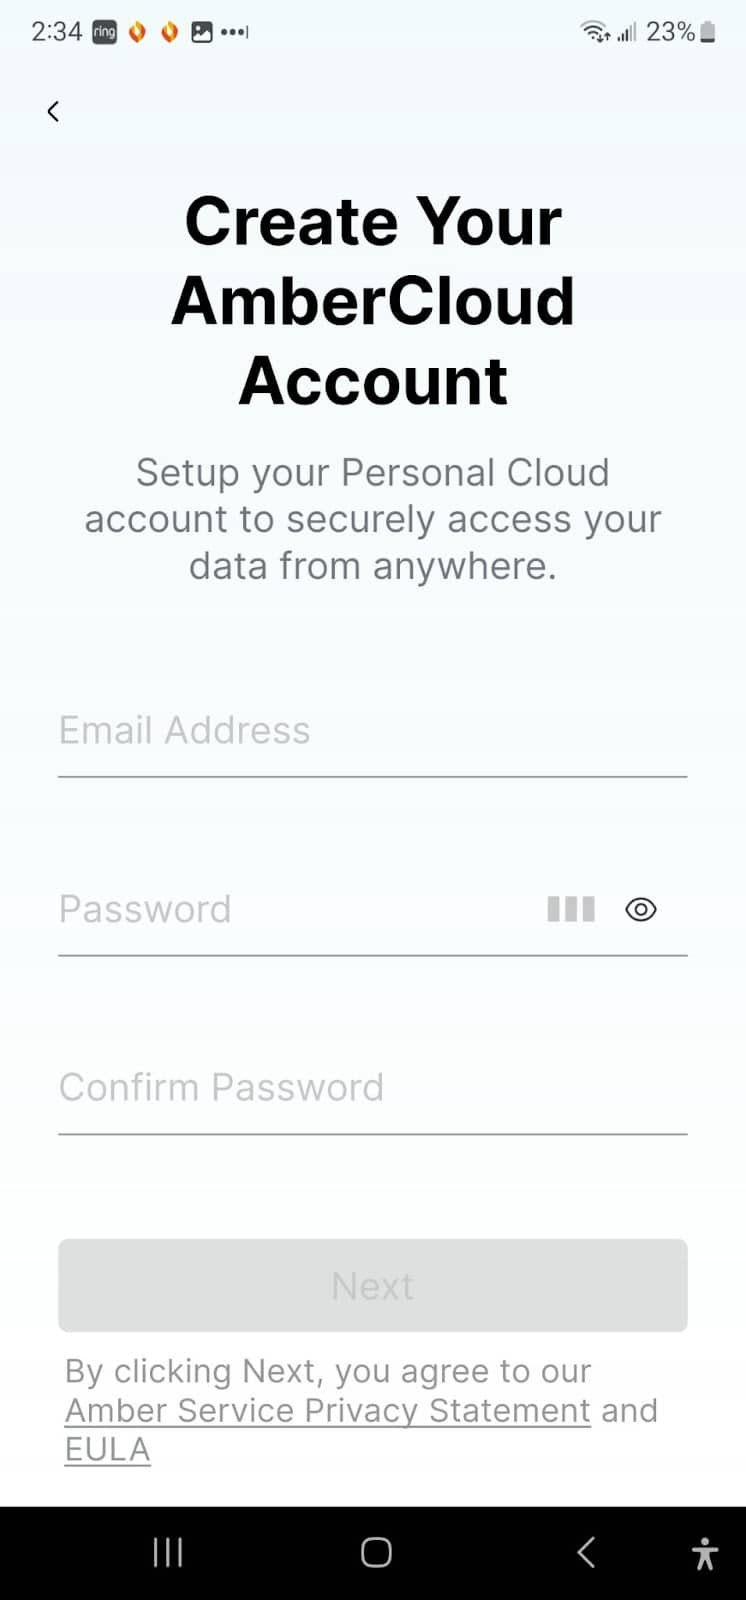
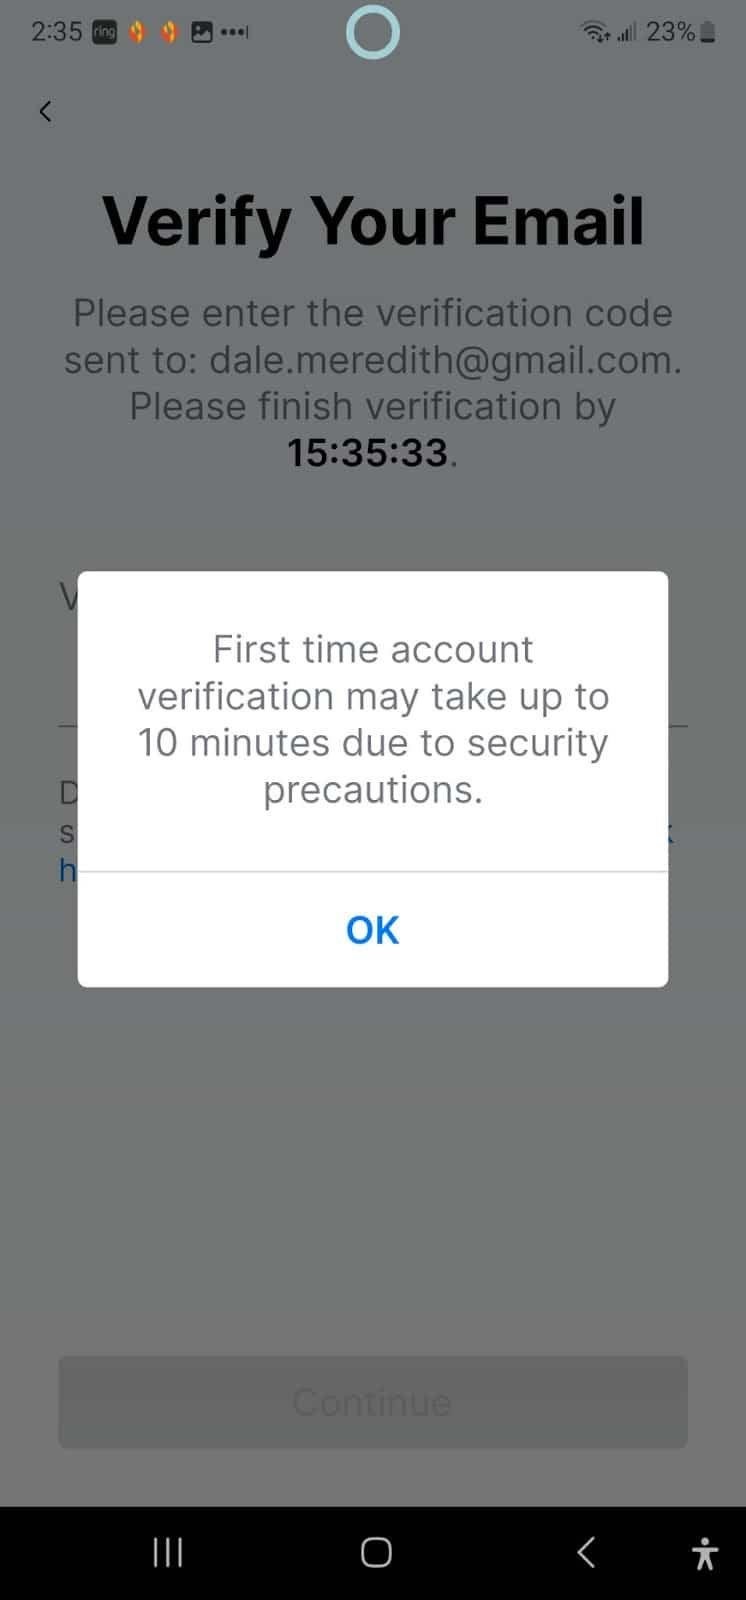
Joining the AmberCloud Family
If you're new around here, you'll need to create an AmberCloud account. Already part of the family? Then just log into your existing AmberCloud account. For the newbies, a special code will be zipping its way to your email inbox. If it takes longer than a coffee break (about 5-10 minutes), it might be playing hide-and-seek in your Spam folder.
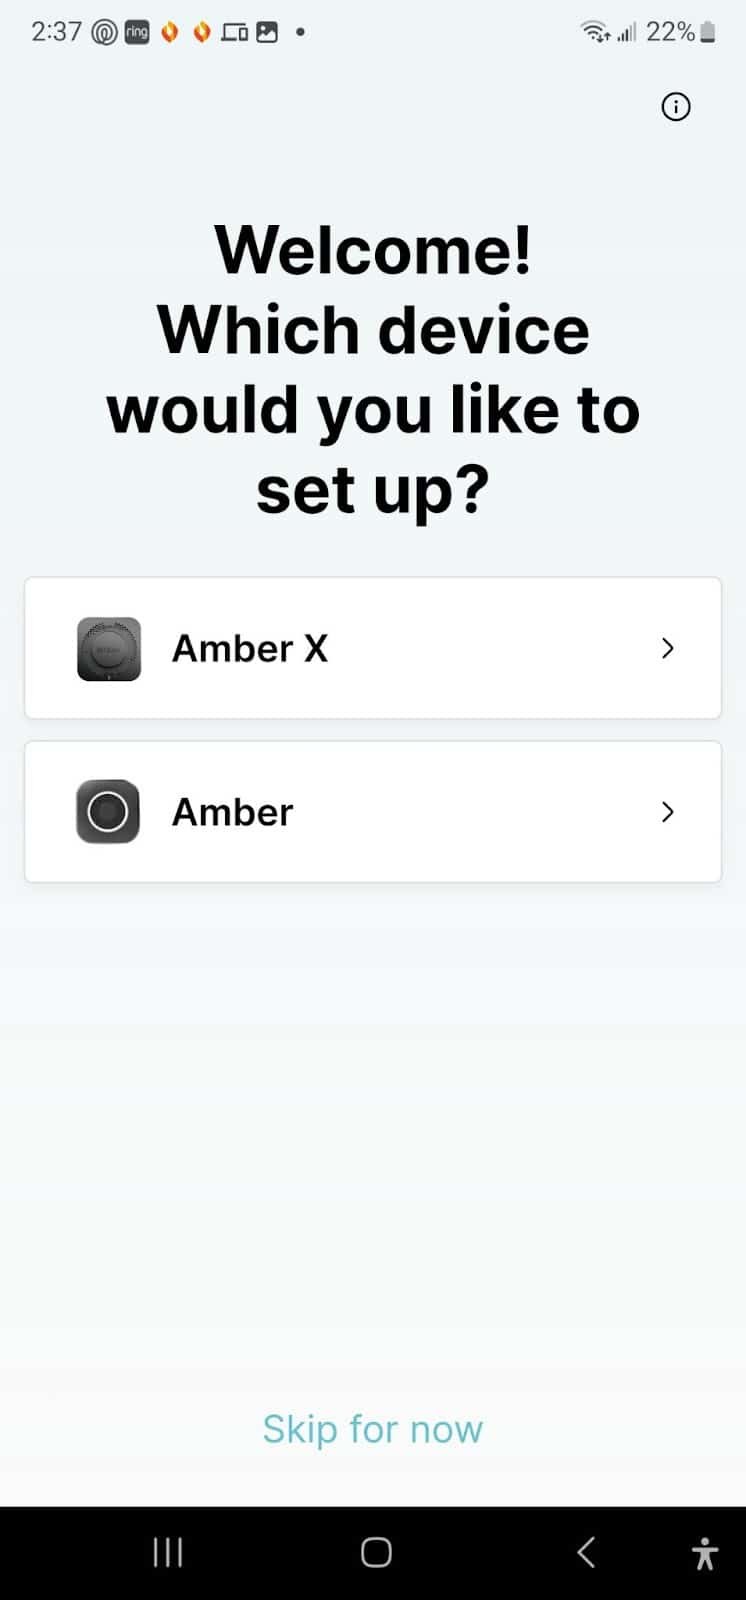
Which Amber?
Next, you’ll have to choose which Amber device you have. Here’s a hint, Look at the images on your screen and then look at the device on your table. See, I told you this was easy!
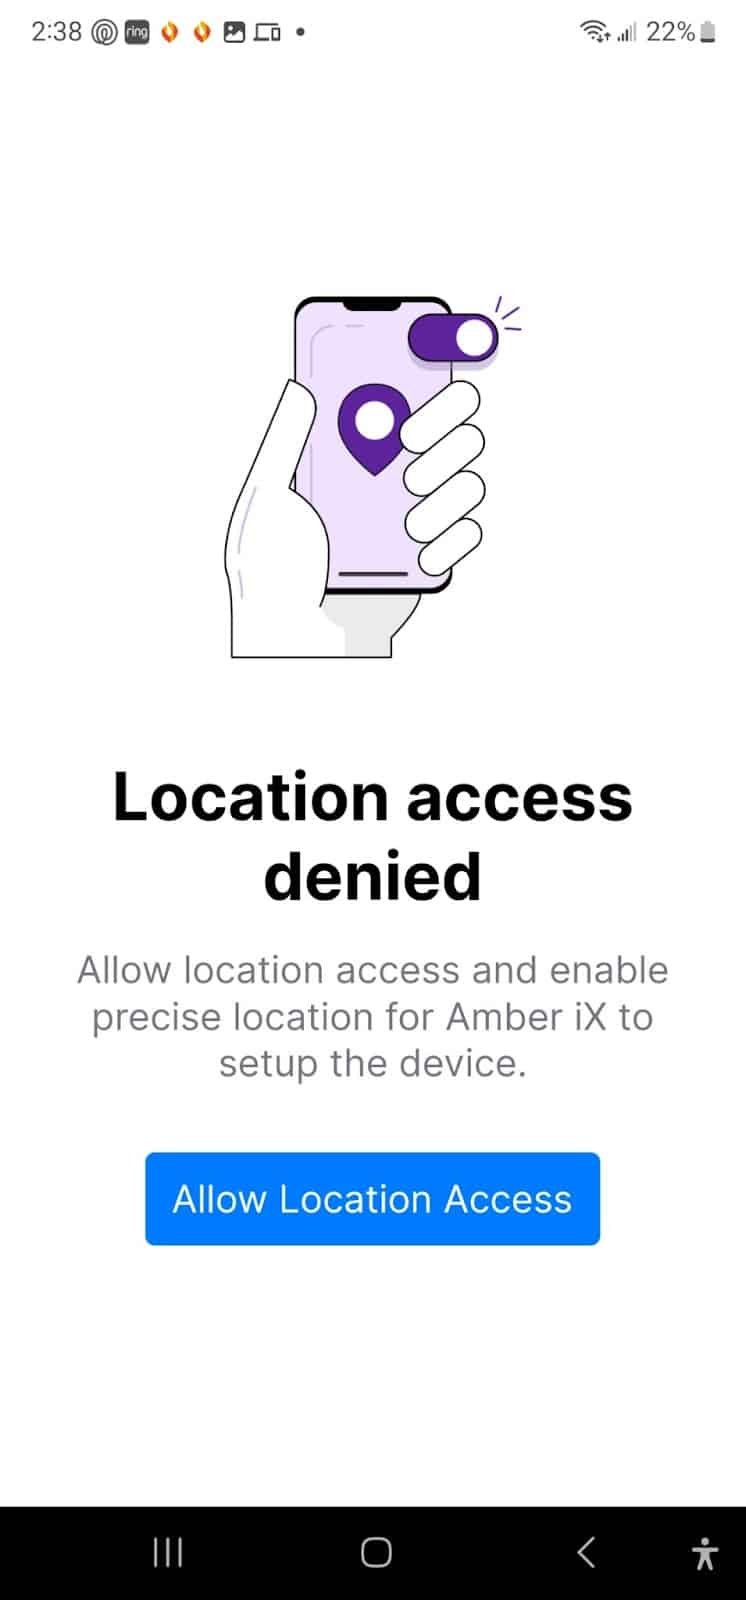
Now if you’re GPS settings are turned off, the setup will detect that, and you’ll see the following screen. Location access is required during setup so the app can find and identify the Amber device. You can turn it off after setup if you want.
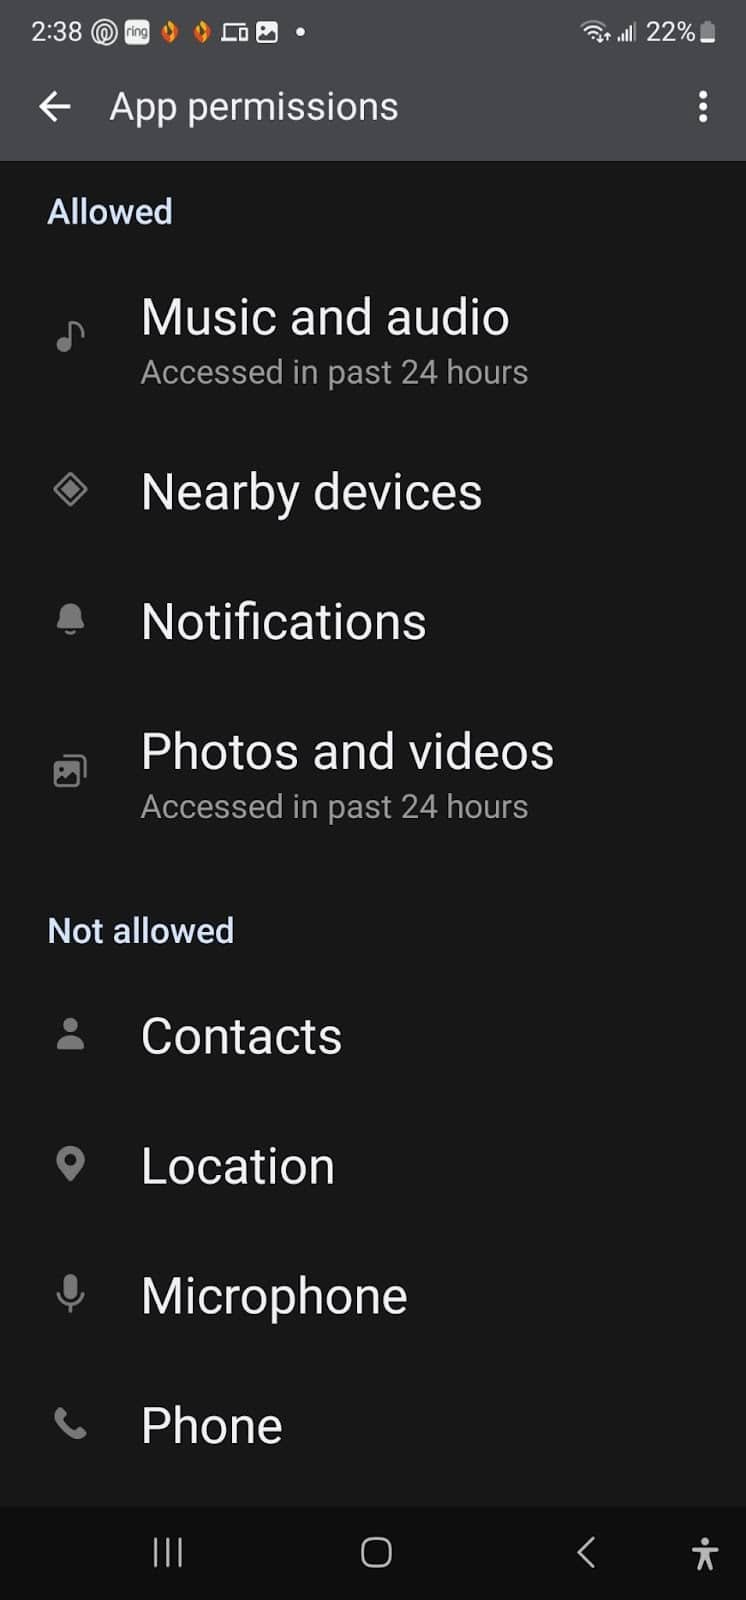
Permissions, Permission, Permission
The app also needs some permissions on your device to make it’s features work correctly. Nothing tricky here, if you want to backup your photos…then you’ll have to allow Amber access to your photos, right?!
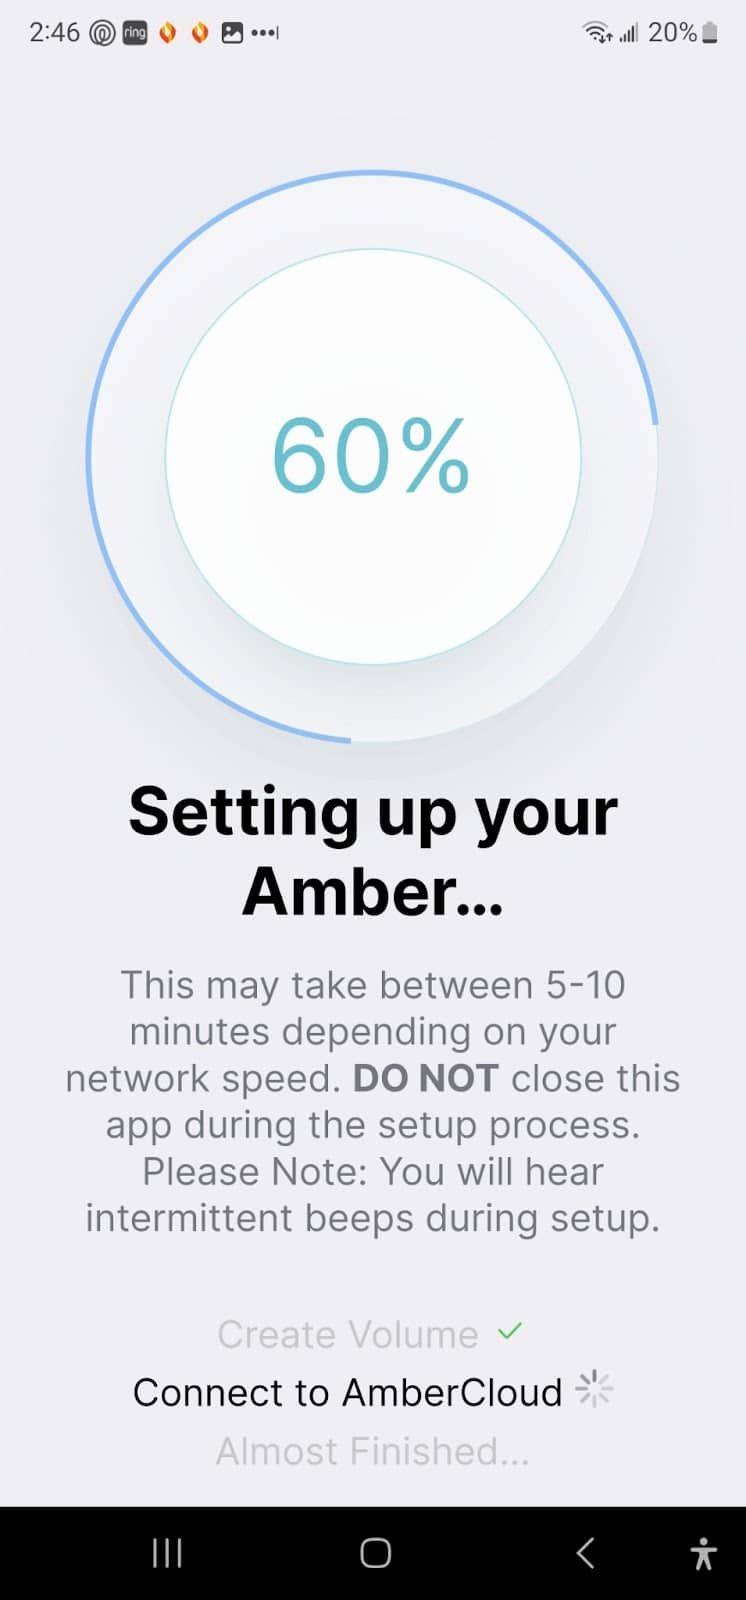
BOOM! Found You!
If all goes well, the app will find your Amber device and begin to configure it. This might be a good time to go get an energy drink or grab a bite to eat, cause it might take a few minutes to finish the setup, and yes, they aren’t joking about hearing a couple of beeps during the setup!
WiFi Wonders
Now, let's make some digital connections. Setting up WiFi is our next step. You’ll be presented with a configuration screen for your WiFi settings. Even if you're an Ethernet enthusiast. Trust me, it's worth it. Now one bug I discovered here is that the Amber X will pickup which WiFi network your phone is connected to and won’t let you change it until after the setup is complete. I’ve reported this bug to their support folks, and I bet they’ll patch that, but just be aware of this.
What's in a Name?
Time for a little personalization! You can give your Amber X a name. If you're drawing a blank, don't worry. Accept the default name for now. You can always change it when inspiration strikes.
It’s ALIVE!
After it finishes, you’ll see your dashboard. You’ll see your Amber X appear. Now the first thing I’d do is apply any updates since there’s a good chance things have changed since your Amber came off the factory line.
And just like that, you're all set! But remember, your journey with Amber X is just starting.
The Real Magic of Amber X
Once the setup is complete, the wizard will walk you through backing up all your photos/videos off your phone/device. And when I say “all your photos”, I mean photos and videos you’ve taken with your phone, from Tik-Tok, Twitter, Slack, Instagram, WhatsApp, heck, even Google Maps! Basically, any app on your device that utilizes photos or videos can be tagged. Now I did a custom backup because I don’t care about photos from some of these services, but I still had over 4,000 photos/videos that the Amber device picked up. But it’s cool because the Amber iX app works in the background, and after about an hour, all my images were backed up. Here's what’s really cool. The app has an option to “clean up” your phone…which means to delete the photos/videos that have backed up off of your phone. Now you don’t have to worry about running out of space on your phone when you’re taking photos. I can always open the Amber iX app and look at all my photos/videos, plus i can share them with folks too!
Oh and if you’re wondering, my 4,000+ photos and video only took up 70GB. That’s just over 14% of what I can store on this bad boy. Now if you want more space, you can (as I mentioned earlier) add an external drive, or you might want to think about looking at the Amber Pro, which I’ll be looking at in my next post.
Artificial Intelligence, Say WHAT!
Okay, everyone, brace yourselves for the real game-changer: Amber's AI-powered photo organization feature! As if Amber wasn't already impressive enough, they've managed to incorporate AI technology to make it an even more powerful tool in our digital lives.
This feature is nothing short of magic, folks. Imagine, you've got thousands of photos stored – a typical scenario for most of us. But you're trying to find that one particular shot from your summer vacation three years ago, or the sweet picture of your niece at her first birthday party. Normally, you'd be scrolling endlessly, right? But here's where Amber's AI comes into play.
Their sophisticated AI system has face-detection capabilities. Yes, you heard it right! It can identify faces, making it super easy to find pictures of specific people. But wait, it gets better. This AI doesn't just stop at recognizing faces, it can also identify objects and locations. So whether you're searching for a sunset picture taken at the Grand Canyon or photos of your beloved pet, Amber's AI has got you covered.
Now, I know what you're thinking. 'Isn't that a bit creepy? Could this mean my personal data is at risk?' Rest assured, your data privacy is a top priority for Amber. The amazing part of this all-in-one smart storage platform is that while it leverages advanced AI technology, it does so with the utmost respect for your privacy. Your data stays your data, not shared with anyone else. So you can enjoy the convenience of advanced AI photo organization, without the usual privacy concerns.
In a nutshell, Amber's AI gives you the power of an advanced photo search engine, all while ensuring your precious memories remain safely under your control. It's like having your very own, private Google Photos, WITHOUT the yearly fees!
It’s Not Just about Photos/Videos!
Digging deeper, the true magic of Amber X reveals itself in the Backup feature. This feature vigilantly tracks changes in specific folders (and the files inside), automatically initiating a backup with each modification. It's a lifesaver for those of us who forget to backup our files regularly - an effortless alternative to running a full drive backup each time a new file appears. It’s basically like your own Dropbox!
Securing Your Data with Amber X
When it comes to security, Amber X stands its ground. The device leverages two distinct layers of encryption: TLSv1.3 and the dm-crypt AES-XTS cipher, adding robust protection against unauthorized access. So whether it's photos & videos or important documents, Amber X has your back. With its powerful combination of automation and security, it's easy to see why tech-savvy users are looking closely at this solution.
Something You Can’t Put a Dollar Figure On
Oh, and folks, we can't wrap up without talking about Amber's exceptional customer service. It's like a cherry on top of their already impressive product. Let me share my personal experience with you.
Like many of us, I've had my fair share of less-than-stellar customer service experiences. We've all been there, right? But when I faced a small hiccup with my Amber device, I decided to give their customer service a try. I initiated a chat session, fully prepared to be tossed from one representative to another. But to my pleasant surprise, the exact opposite happened!
Not only did the representative – shoutout to the fantastic Michael – stay with me throughout the session, he helped me resolve the issue without any hint of rushing. His patience was truly commendable, and his level of dedication to ensuring my issue was fully resolved blew me away.
And guess what the best part was? This top-tier service didn't cost me a penny. It's truly refreshing to see a company standing by its product without hidden fees for customer support. Far too often, we purchase a product, only to be slammed with support charges when we need help. But with Amber, it's a whole different story – a story of commitment, quality service, and customer satisfaction.
So kudos to Michael and the entire Amber customer service team. Your dedication is appreciated and certainly doesn't go unnoticed. They've set the bar high, folks, and it's about time other companies take a leaf out of their book!
The Verdict: Is Amber X Worth It?
If you've been pondering, "Is Google Photos really the best photo storage option?" then the arrival of Amber X might tip the scales. With its streamlined setup, abundant storage capacity, and interface that champions user-friendliness, no monthly/yearly fees and no compression of your photos, Amber X redefines personal cloud storage.
The device shines whether you're transitioning to a new phone or decluttering your hard drive. While there are minor differences in the user experience between the desktop and mobile apps, the Amber X is largely an efficient and versatile device.
So, should you invest in an Amber X? If you appreciate the ease of use, and storage flexibility, and you're in the market for a reliable Google Photos alternative, then Amber X is certainly worth exploring. While no solution is flawless, the Amber X presents a compelling case as a comprehensive and user-friendly alternative to mainstream cloud storage options. I’ll be recommending this device to my family and friends.
In recent years, the smart home revolution has taken the world by storm. From thermostats to security systems to lights, there are countless ways to make your home smarter and more efficient. One of the most popular methods is using devices that are compatible with Amazon's Alexa digital assistant.
What Is Amazon Alexa?
Amazon Alexa is a digital assistant developed by Amazon for use on compatible devices. With Alexa, you can control many aspects of your home through voice commands. This includes adjusting the thermostat, managing the lights, playing music from streaming services, and more. It even has integration with popular third-party services like Uber and Dominos Pizza. All you have to do is say "Alexa," followed by your command or question, and she'll respond accordingly.
Philips Hue lighting is an excellent way to bring some automation into your home lighting system. The bulbs connect directly to your Wi-Fi network and can be controlled via voice commands with Alexa or through the accompanying app. You can even set up routines so that your lights will turn on at a certain time each day or when you come home from work.
Why I Love Philips Hue Smart Lighting? I have had a smart home setup for a few years now and my favorite addition to it has been the Philips Hue smart lighting system. With custom timers, color-changing LEDs, remote access, away-from-home dimming and so much more, smart lighting makes my house feel luxurious and modern every time I switch it on. What I love most about this smart lighting system is how easily programmable it is. Whether I want the lights to turn off after a certain time or if I'm feeling creative with my lighting moods, I can customize all that quickly and easily through the app.
The Ecobee thermostat is one of the best available smart thermostats on the market today. It connects directly to your Wi-Fi network and allows you to adjust temperatures in your home via voice commands with Alexa or through the accompanying app. It also features motion sensors that detect when someone is in a room and adjusts temperatures accordingly for maximum energy efficiency.
I love the smart thermostats are the perfect way to smarten up your home! If you program it right, you'll never have to come home to a cold house again, since you can operate and manage it right from your smart device. And with its sophisticated smart sensors, Ecobee can automatically adjust the temperature so you always stay comfortable without wasting energy. What's more, is adding an Ecobee smart thermostat is easier than ever before!
The Wyze security system is an affordable yet powerful way to protect your home from intruders or other threats. The system comes equipped with motion detectors, window/door sensors, and much more which can all be monitored remotely via voice commands with Alexa or through the app on your smartphone device. You can also receive notifications whenever motion is detected in any part of your home for added peace of mind.
If you are looking for a reliable, economic, and easy-to-install home security system, then Wyze fits all of these needs. Not only is Wyze dependable, but it has a wide range of features that make it stand out from others in its category. It gives users the peace of mind that their homes and family are protected. Wyze also provides excellent customer service, responding quickly to any inquiries. With Wyze Security System, you can now sleep without as much worry knowing your home is safer and more secure.
The Nest Learning Thermostat is another great option if you're looking for a smart thermostat that works with Alexa-compatible devices. This thermostat learns from your behaviors over time so it can automatically adjust temperatures based on when people are in different parts of the house or away from home altogether. Plus, it offers remote access so you can adjust temperatures even when you're away from home using just your phone or tablet device.
Nest Learning Thermostat has been a game changer for the heating and cooling industry. Not only has it made life so much easier (and smarter), but we don’t have to worry about manual adjustments to heating and cooling. Don’t like the family messing with the temperature? You can lock the thermostat! What I love most about Nest (and smart thermostats in general) is that Nest makes it incredibly effortless to save energy and save money. Nest also brings extra style to my home, with its sleek tech design taking center stage against our living room wall. In short, the Nest Thermostat is an absolute must-have for anyone looking to add some tech convenience and style to their living space!
Your Smart Home With Alexa Awaits
Smart technology has completely revolutionized how we interact with our homes today and Amazon's Alexa digital assistant is no exception! By connecting compatible devices like Philips Hue lighting or Nest learning thermostats directly to your Wi-Fi network, you can use voice commands to control various aspects of your living space from anywhere in the world! Regardless of what type of smart device you choose for use with Amazon's digital assistant platform, there are endless possibilities waiting for you just around the corner!


 My rule: treat OpenClaw like shadow AI that can touch real systems in your home network, because it can. Testing safely beats being fearless.
 Photo by