by Staff | Dec 2, 2022 | Smart Home
Maybe you’ve heard of Google Routines and maybe you haven’t. Want to get your life and home in order with a little help from Google? You can leverage the power of Google Home and Google Assistant to create Routines that just make life so much better. Not many people know about Routines, yet they have the technology to implement them. It baffles me.
I wanted to walk you through the process of setting up and personalizing Routines and showing how they work. It’s not just about turning off lights or having things turn on when we leave. It’s way more than that. It’s about having our smart homes always ready and working for us no matter when (and in some cases where). I absolutely love Routines and believe they are the key to unlocking the true potential of a smart home.
DISCOVER: Smart Home Automation Ideas You’ll Love
What Is A Google Routine?
If you have Google Home and any smart devices that work with it and you aren’t using routines, you have one thing to do immediately after reading this post: create your first routine. Don’t worry if you don’t know how, we’re going to help you out with that. But you need to know what a Google Routine is first.
Google Routines are a way to automate tasks in your home using voice commands. It’s a series of actions you want your devices to do when you want them to do it. They’re really easy, straightforward, and can be implemented quickly with little effort. No seriously, they’re really easy. I love them because they make my tech work for me, not the other way around. Now, some Routines are a little more advanced, but generally speaking, they’re easy.
LEARN MORE: Cool Things To Do With Google Assistant
The idea of Routine is simple: you want certain actions done automatically when prompted by either Google Home or through the app on other devices like tablets/phones, thermostats, lights, etc. It’s not just outright speaking aloud “OK Google…do this” either. You can have these scheduled, which I love.
How To Set Up Routines
Setting up routines in Google Home is really easy. You’ll need the Google Home app. But…it’s the Google Assistant that carries out the routine (automation portion).
On the front screen of the app, you’re going to want to open the Account section (look in the top right where your avatar is, then select Assistant Settings and then Routines.
TRENDING: Ways Google Assistant Can Improve Your Health
From here you’ll see some pre-configured Routines, which Google has supplied. If you’ve never used Routines, I’d click on one of them to get a feel for what they look like and what they can do. For example, in the “Commuting to work” prebuilt Routine, the Starter should say something like “When I say to my Assistant ‘Let’s go to work” then the Actions are “Tell me about my commute to work + Tell me about the weather + Tell me about today’s calendar + Play Music.” It’s also important to note that every Routine you see here (pre-configured or custom-built by you) can always be edited and/or deleted.
Adding your own Routine to the mix is super easy. Just hit the colored “+ New” button in the top right-hand corner in the Routines section. From here you can select the Starter (how you will start it) and what Actions you want to include. What I love is you can have multiple Starter prompts. You’re not limited to just one. For example, I have a smart alarm set to wake me up every day at 6:30 a.m., but there are a lot of times I wake up before then and say my Starter command to begin the sequence before. These can be set on specific times and days of the week.
RELATED: Simple And Smart Kitchen Appliances
Configuring or customizing a Routine to work for you is where the real power lies in all this smart automation. It’s rather simple too. I know I’ve really become accustomed to Routines because I miss that smart home component whenever I stay in a hotel, Airbnb, or some other resort. They really do make your life easier. Customizing them for you is a big part of that.
There are two components you need to know that are crucial to run a Routine. There is the Starter (what you say, at a specific time, at sunrise or sunset, or when an alarm is dismissed ~ I like to think of this as the trigger of the routine) and then the Action (the thing you want Google Assistant to carry out through all of your smart connected devices). For example, on work days you can have Google Home wake you up at 6:30 am, announce the weather, tell you the news (from your favorite news source), turn your lights on at 50% brightness, start making your coffee, set the thermostat at 72, and on and on. Completely automated without you giving it a voice command.
For each Starter and Action, you can select each individual one and customize it. You can add and delete Starters and Actions. What I love is none of the customizations will become permanent until you hit the Save button. Just know there are thousands of things your Google Assistant can do. Anything the Google Assistant can do, you can add it as part of a Routine. This is why there are literally millions of different permutations of Routines you can create.
BOOKMARK THIS: Basic Smart Home Automation Tips
As a Dale tip, I’d start simple. Start with one Routine. Work it for a few days. As the week progresses, think of ways you can personalize it for yourself. For example, maybe you have a bedtime Routine set up that dims lights to 10% brightness, locks the door, and plays a Sleep Sound of a Babbling Brook. But you’re getting tired of the Babbling Brook and want your lights all the way off. You can go into each action and customize those and maybe add an announcement that tells you your battery level (no one likes to start the day with their phone battery at 20%).
by Staff | Nov 28, 2022 | Reviews, Smart Home
The Amazon Fire TV Stick is a small streaming device manufactured by Amazon that plugs into an HDMI port on the back of your TV. It’s one of my most used devices in the home. It’s one my kids use a lot as well. This device allows you to connect to the internet and stream videos on demand on your tv through apps. Just about any streaming app you can think of can be found in the Amazon App store.
When it comes to streaming content with apps, the Fire TV Stick works kinda like your smartphone. In most smart TVs, it’s often difficult or impossible to sideload other apps, so you are stuck with the apps that come from your smart TVs app store. Not the case with the Fire TV Stick. This device is much more flexible as you can install apps from a wide variety. But I’ll be honest, most people just use the device with its preset settings completely unaware that you can enhance the experience.
DISCOVER: Best Place To Buy Your Electronics
The Best Tips And Tricks For Your Fire TV Stick
With roughly 40 million users of the Fire TV Stick, it’s a very popular device. But what really surprises me is the lack of leveraging features to give you a better viewing experience. Out of the box, the Fire TV Stick is great. No major complaints. But there are a bunch of little tips and tricks you can do that just make it so much better (and safer).
1. Pin Your Most-Used Apps
If you have installed dozens of apps from the Amazon App store, finding the ones you want to use frequently may become difficult. I think it’s a pain to find apps I use in the app section of the interface. You can pin the most frequently used ones to the home screen so they’re easy to find. All you do is take your highlight cursor over the app you want to pin (don’t select it). Hit the Menu button on your remote (three little lines) and select “Pin To Front”.
LEARN MORE: Did You Know Amazon Is Using Your Internet For Their Own Network?
2. Disable Automatic Audio And Video Playback On Fire TV
The Featured Content page on the Fire TV home screen plays the most recent movies and TV shows from partner apps by default, which can be REALLY annoying. I also notice my Fire TV Stick getting glitchy when they auto-play as well. You can easily disable autoplay for audio and video by just doing a simple adjustment from the Settings menu. Go to your Settings and select Preferences from the options. Scroll until you find “Featured Content” and turn off the Allow Video Autoplay and Allow Audio Autoplay features. You can thank me later.
3. Adjust Fire TV’s Privacy Settings
This is another no-brainer option everyone should do. There are concerns regarding privacy because Fire TV devices must be connected to the internet. The content you watch, the amount of time you spend using the device, your location, your most used apps, and other details can all be tracked when you use a device. If you are uncomfortable with constant tracking, disable the behavior from the Privacy menu.
4. Make Use Of Your Phone’s Virtual Fire TV Remote
You can easily control your Fire TV using the Fire TV remote app on your iPhone or Android phone. There have been times (lots of times) when the Fire TV Stick remote gets lost or it runs out of batteries. That’s when this trick really comes in handy. The app offers the same buttons and functions as the remote.
5. Create Multi-User Profiles
On your Fire TV, you can create separate profiles for you, your spouse, and your kids. With recommendations for movies, TV shows, and pinned apps, users get a personalized Fire TV experience. This is one of my favorite and most underutilized features of the Fire TV Stick. You can create Kids profiles doing this which will give you more control over what your kids are watching.
TRENDING: Toddlers And Tablets: What You Need To Know
Another quick tip on profiles. To easily switch in between profiles, press and hold the Home button on the remote and a pop-up will appear prompting you to switch profiles. You can also use this little Home button trick to open other Apps and put your device to sleep.
6. Access Diagnostics Information
This is for advanced users. There is a hidden diagnostics panel on the Amazon Firestick. You are granted access to a ton of information, many of which is essential for advanced settings. Frame rate, CPU load, video codecs, display resolution, memory usage, current internet streaming speed, and other diagnostic data are just a few examples. You’ll want to press and hold Select (Center button) for one second and while still holding it, press the hold the Down direction button for three seconds. Then release both and press the Menu button. From there a pop-up will appear and you’ll want to turn On the Advanced Options and System X-Ray.
7. Restart Your Device Using The Remote
You don’t have to turn off your television if your Fire TV Stick freezes. Using the remote, you can just restart it. It’s really easy to do. Hold down the Select and Play/Pause buttons at the same time for five seconds. Even if the screen is frozen (which doesn’t happen on the later generations as it did on earlier versions), this quick restarting tip will work. As a side note, you can also restart your device from the menu screen or by simply unplugging it as well.
RELATED: Best Streaming Devices For Your Home
8. Send Video Footage From Security Camera To The Fire TV
This is a pretty cool trick you can do with your Fire TV Stick: live video feeds from home security cameras can be directly displayed on Amazon Fire TV. You’ll only be able to use this feature with Alexa-enabled devices. If you utilize an IFTTT applet, you can actually have this feature automated.
9. Disable Interest-Based Ads On Your Fire TV Stick
Going to be honest, I wish there was a way to kill advertisements altogether, but I realize corporations have to make money. You may not know that your Fire TV is tracking your behavior for a lot of purposes, and advertising is one of them. However, Amazon does allow you to turn this feature off. Please note that you will still get ads, they just won’t be lasered in on what you were just talking about with your family at the dinner table. Go to Settings, then Preferences, then Privacy Settings, then Advertising ID and turn Interest-based Ads to off. Once enabled, the apps on your device won’t be able to use your advertising ID to build a persona profile to serve you personalized ads.
BOOKMARK THIS: How Your Kids Are Hacking Parental Controls
There is an argument to be made about the benefits and advantages of using interest-based ads. But I think the Cons far out-weight the Pros. One reason I enabled this is that if they are collecting that data and utilizing it, it’s going to take some amount of memory and bandwidth to transfer that data. That’s more input and output for your device. Without running any formal data test on if disabling this cuts down on bandwidth usage from your Fire TV, my gut tells me it does. The other issue is privacy. Less personal data on our behaviors being sent to the cloud is a positive.
Features Vs Privacy Vs Experience: How Do You Prioritize?
You’ll notice that a handful of these tips are putting data restrictions on what Amazon collects about you. Some would argue that turning these features off will dampen your user experience. It’s the “but we’re collecting data on you to give you a better experience” argument. There’s a little bit of credence to that as well. Amazon continues to develop features that enhance the user experience for its customers. I’m all for that. However, I have found that enabling these tips and tricks hasn’t interfered one bit with how I interact with my Fire TV Stick device. Personally, I think it helps the device run smoother. You don’t have to do all of these, but I highly recommend you adopt at least one. And if you’re serious about your personal data being stored in the cloud, I’d act on all those tips. Quite frankly, you can make your watching experience more enjoyable and safer by utilizing these Fire TV tips and tricks.
by Staff | Nov 2, 2022 | Reviews, Smart Home, Tech Living
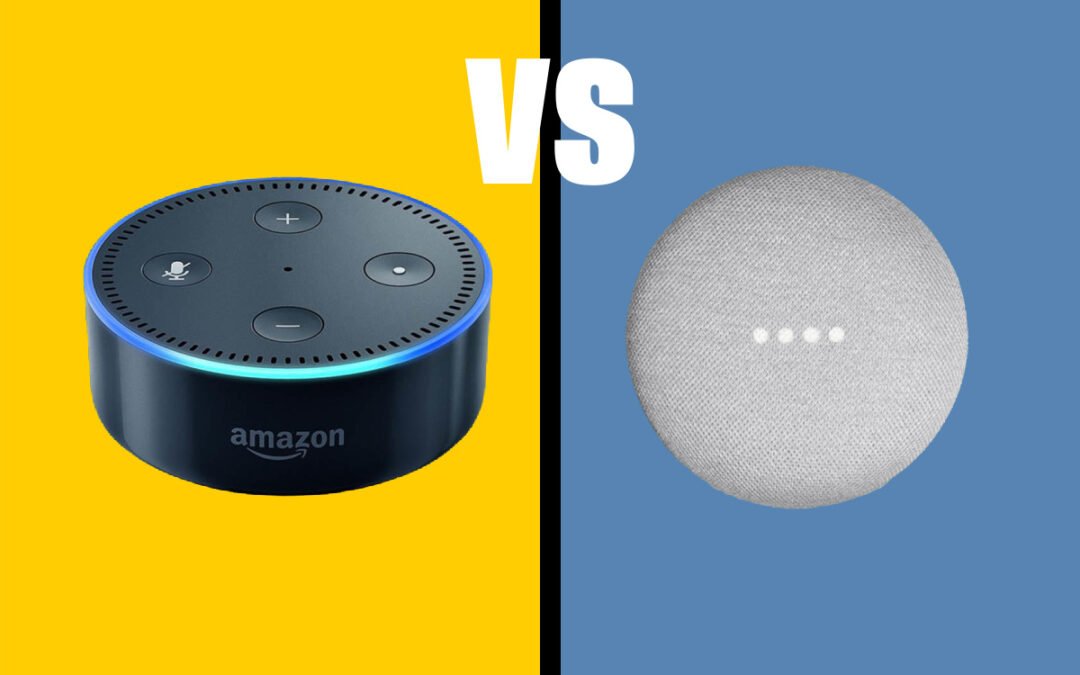
Are you going to buy a speaker or a smart home automation assistant but finding it difficult to choose between Google Nest Mini and the Amazon Echo Dot? Do you want a voice-activated assistant to help you with your day-to-day tasks? You’re probably wondering if the Google Nest Mini or Amazon Echo Dot is the right device for you and your family. We break down the most important features as we compare these two devices and help you decide which one is best for your needs.
The Features That Matter For Your Smart Home Assistant
Both the Google Mini and Amazon Echo Dot are great devices for families. Not going to lie, we have both in my home. That’s how good both of these are. But which one is better? Let’s compare the features that matter most between these two devices to help you decide which one might be best. We analyzed feature sets like design, utility, sound, technology, and ease of use to help you make the best decision possible.
BOOKMARK THIS: Basic Smart Home Automation Tips
Design
Both of these speakers have slightly different sizes. There are LED lights present in both of them. I do think that the Amazon Echo Dot utilizes their LED lights more efficiently than the Google Mini. Seeing my Amazon Echo Dot with an orange-yellow light for notifications is something I’ve grown accustomed to.
The new version of the Echo Dot has a spherical shape and assists in making it look bigger compared to its counterpart. Furthermore, the Google Nest Mini doesn’t contain a clock option, but still, it utilizes LED dots for communication. It is also worth mentioning that it is available in charcoal, chalk, and sky. To me, colors don’t matter that much because the color doesn’t necessarily add any extra value (at least not significantly), but it’s a design feature worth mentioning.
One thing I want to point out: the build quality is remarkable in the Google Nest Mini as well. I love the compact design of both of these because you can integrate them into your home with one of these wall mounts for the Google Nest Mini or the Amazon Echo Dot. You can easily place them around the house without sacrificing your home décor or just getting in the way (note that you need a plug to use one of these home assistant mounts). And the ultra-compact design (and price for that matter) allows you to create an easy-to-use plus cheap smart home intercom system.
Winner: Tie
TRENDING: Setup An Easy and Cheap Smart Home Intercom System
Connectivity And Utility
Amazon Echo Dot has a powerful smart home ecosystem. Compared to the Google Nest Mini, it’s a little better because of some cool utility options. Alexa has got a lot of amazing smart features that include things like skill blueprints as well as the whisper mode.
Moreover, Alexa has learned a lot of new stuff and keeps learning daily. I’m impressed at how Amazon strives to make the smart home experience better. It should also be noted that the routines and the reminders of Alexa are much improved than when the technology was first launched. But I want to return to a feature I just mentioned: I love Alexa Skills. Essentially, these are enhancements where you can really amp up the performance and utility of your device. Google does have skills and commands for their home assistant devices, but they just don’t compare in utility and efficacy vs Amazon’s Alexa. In this regard, the Amazon Echo dot is a better option when it comes to connectivity and utility.
Winner: Amazon Echo Dot
DISCOVER: The Best Amazon Alexa Skills
Sound Quality + Technology
Sound matters. Whereas most people aren’t going to use one of these for blasting music, sound quality and the technology behind it are still important for these small home assistants. If you’re looking for a quality small speaker system, the Amazon Echo Dot is the better option. The Echo Dot has a noticeable advantage with sound quality compared to the Google Nest Mini and it’s also more affordable. The Echo Dot uses a combination of Dolby processing and seven microphones to deliver clear, loud, and nuanced sounds. The Google Mini, on the other hand, only has two microphones and doesn’t use any Dolby processing. As a result, the Mini just can’t match the Echo Dot’s sound quality.
RELATED: My Favorite Alexa -Enabled Devices
In addition, the Echo Dot has a more robust speaker system than the Mini. The Dot has a 2.5-inch woofer and a 0.6-inch tweeter, while the Mini only has a single 1.57-inch full-range driver. The Echo Dot’s superior speaker system ensures that you’ll have great sound quality, no matter what you’re listening to. And it’s not just about music either. I rely on my mini smart home speaker to deliver news, updates, reminders, and a slew of other notifications.
Winner: Amazon Echo Dot
Ease of Use
One of the main reasons why the Echo Dot and Google Nest Mini are so popular is because they are very easy to use. Both devices have a simple design. Both have impeccable technology that lends itself to making these devices simple.
Google Nest Mini and the Amazon Echo Dot devices both do a decent job of catching voice commands. Occasionally, if there is slight noise interference, you’ll run into issues, but generally speaking, both are adequate at picking up voice commands. In my opinion, if there’s a difference, the Mini’s voice recognition technology isn’t as accurate as the Echo Dot’s, which can sometimes lead to frustration when trying to give commands. I think that’s due largely in part because the Echo Dot having more microphones AND Amazon’s sound engineers are some of the best in the world. By a slight margin, I’d give the edge to the Echo Dot for those looking for a simple, easy-to-use voice assistant.
LEARN MORE: Best IFTTT Home Security Systems
In terms of smart home integration and syncing these home assistants with another internet of thing devices, both do a phenomenal job. Most smart devices integrate with both Google Assistant and Alexa, so I don’t think either one of these home assistants has an advantage there.
Winner: Narrow Win For Amazon Echo Dot
It Really Comes Down To You
The best option really comes down to you. Before investing in one of these smart home assistants, it is essential to know all the specs and features so you won’t end up buying a useless thing. One of my pet peeves is seeing or hearing of people not using a smart device simply because they “don’t know how” or “it doesn’t work with what we have”. Even more important and on that note, take an inventory of all your smart home devices and get the home assistant that will fit your technology needs. Get one that will augment your smart home ecosystem. If you have devices that mesh better with Alexa, get the Amazon Echo Dot. If you like Google or you have more smart devices that fit with Google Assistant, go that route.
For the record, I don’t think there’s anything wrong with having a Google-based ecosystem AND an Alexa-based ecosystem either. There are some in my family who love certain things about the Amazon Echo Dot and there are some who like Google Assistant devices better. It doesn’t have to be an either-or situation. In fact, I have both in my home, which does lead to some confusion on my part.
>> Get Your Google Nest Mini Here <<
by Staff | Oct 28, 2022 | Reviews, Smart Home
DIY home security. Nowadays, it’s impossible to drive down any street and not see a Ring doorbell camera or something really similar. These DIY home security systems are very popular and the market grows every year. In fact, the home security systems market will be an $84 billion market by 2027. Most people are looking for a DIY home security system that will keep their family safe. Don’t necessarily want a ton of bells and whistles, but want effective home monitoring. We wanted to compare the Ring Alarm vs Arlo Pro home security systems to help you decide which one is right for you. Both of these systems are popular DIY security options, but they have some slight key differences that you need to know about before making your decision.
Arlo vs Ring Comparison
We all know home security is important for keeping your home and family safe. There are many different home security systems on the market, some high-end professional grade, and a ton of DIY options. But two of the most popular are Arlo home security and Ring home security. Both systems offer a variety of features to help keep your home and property secure. For example, both Arlo and Ring offer motion-activated cameras that can record video and send alerts to your phone if someone enters your home. Both systems offer doorbell cameras that allow you to see who is at your door and speak to them through your smartphone. Finally, both systems come with a base station that helps to connect all of your devices and allows you to control them from one central location. While there are some differences between Arlo and Ring home security, both offer a great DYI option for keeping your property and home safe.
DISCOVER: Home Automation? What Is That? We Answer That And More!
Some other similarities between the two:
- Arlo and Ring are DIY friendly
- Term-free (you don’t have to get roped into multiple-year contracts just to use the hardware)
- Wireless surveillance
- Feature-rich and reasonably priced
- Both are extremely easy to set up and install
- Both have easy-to-use apps to make home monitoring enjoyable
Arlo vs Ring: How They Differ
Although both of these systems are very similar in purpose, there are some subtle differences.
- Arlo acts more like a surveillance system, while Ring acts and behaves more like a home security system. Arlo’s secure plan feels more like an ADT system, but DIY.
- Arlo’s cameras slightly outperform Ring’s
- In terms of setup and installation, most novice tech users are going to be able to set up Ring in about half the time vs Arlo.
Ring vs Arlo: Quick Installation
A significant strength of Ring is its DIY installation. You don’t need to drill a ton of holes or splice wires. I didn’t need help, but I did check out the tutorials, and Ring’s help center is there and effective. I thought the install guides were a little easier to follow vs Arlo’s. But not by much. Both brands had customer support ready to help in case of trouble-shooting during the installation.
Depending on the system and package, Arlo takes less than 2 hours to set up. Don’t mistake time for difficulty. Arlo is still easy installation. It has mountable cameras (spotlight). You’ll need at least an hour or two for Arlo’s setup. And just Ring, Arlo’s Support Center helps you on the go and is very helpful.
Overall, both Arlo and Ring offer ready-to-use security systems where users can quickly plug and play. No hassles, but if you do run into some (and that’s okay), you’ll have customer support. Simply put, both are impeccable when it comes to easy and fast home security installation.
Winner: Ring Home Security
Ring vs Arlo: Connectivity
Both home security systems have wireless setups, which is an absolute deal-breaker if you are doing DIY home security. Having used both apps for monitoring, there isn’t a clear-cut winner on who has the best app. Both perform and operate really well. The one advantage Ring has in the app department of connectivity is the Neighbors app feature. I love the up-to-date crime notifications and video footage around my community.
LEARN MORE: Ring Video Doorbell Tips And Tricks
On the other hand, I love how Arlo connects with Alexa, Google Assistant, Apple HomeKit, and Samsung SmartThings flawlessly. Ring does work with these smart home automation assistants, but for some (like Apple HomeKit) you’ll need to use a home bridge hub or device, which isn’t difficult to do… but’s just one more thing to work around.
Winner: Tie
Ring vs Arlo: Design And Durability
Security equipment quality at Ring is top-notch. The Ring is Amazon’s brand, so the resources to get it right are endless. It comes in different colors and the tech (hardware included) is simple. Unboxing the product shows solid construction. At first feel, it seems like Ring’s product lack quality standards, but the equipment is solid and durable for its price. I still have my first-generation Ring doorbell camera and it still works flawlessly.
Arlo cameras contain top-notch quality materials. When it comes to weather, the conditions can really affect outdoor cameras. No matter if it’s rain, snow, brutal sun, or sleet, Arlo products keep on delivering.
RELATED: Here’s A Crash Course In Home Automation Basics
Overall, we think Ring offers better quality than Arlo, but that’s because I’ve owned Ring products for years now and they still perform no matter what. That’s not to say Arlo makes a cheap product. On the contrary, Arlo is also made from extremely high-grade materials.
Winner: Slight Advantage to Ring
Ring vs Arlo: Automation (Robotics)
Those who love automation love the Ring. It offers smart doorbells, stick-on, spotlight, and floodlight cameras. The Ring integrates really well with other apps that help you unlock smart home automation. You can automate your home with Z-Wave, Zigbee, IFTTT, and more. Google Home and Alexa can control lights and locks. Ring is one of those products that help make your home smart.
READ MORE: Best IFTTT Home Security Systems
Likewise, Arlo home security devices are super compatible with a handful of smart home devices and home assistant systems. Additionally, Arlo is fast catching up to Ring with automation integrations like IFTTT. I think the community of IFTTT is bigger with Ring, so users get some amazing smart home recipes. BUT…Arlo has some clever smart home integrations as well. For now though…
Winner: Ring
Ring vs Arlo: Support
Ring’s customer support overall is fantastic, but there are those variances when it’s not. When it’s good, it’s great. But there have been some who haven’t had as good of an experience with their customer support and that’s normal. We’re aware of it. I’ve never experienced flawless customer support 100% of the time from a company. Despite its adequate quality, some customers find it impersonal. Besides FAQs and blogs, Ring also provides setup guides and in-store support, which I consider a major part of any company’s customer support plan. Users can contact Ring via live chat, email, or phone. Despite exponential growth, service is still good.
Arlo’s support center is also handy. You’ll find everything online: FAQs, articles, and videos. Even their base package includes 90 days of premium phone support, which I think is wonderful (even if they try to upsell me to their secure plan). Both have an extremely high quality of service. Excellent ratings across the board. Getting support from Ring or Arlo shouldn’t be a problem.
Winner: Tie
Which One Should You Buy?
It’s going to depend on your home monitoring preferences. Both are easy to install. Both are easy to operate. The big difference comes down to what you value with monitoring. If you want strictly video surveillance, Arlo is the solid choice. On the other hand, with Ring, you can get video monitoring PLUS the sensors you put on doors and windows PLUS seamless integration into other smart home automation devices PLUS connection to your community. Personally, I love the ability to upgrade and build on the base level of home security setup you get with Ring. If I’m super green and new to this home security game this is what I’d do: get the Ring video doorbell to get comfortable with DIY home security. Experiment by integrating it into my smart home automation.
Once I feel comfortable, I’d upgrade to the 14-piece kit on all the necessary entry points of my home. Once I’m comfortable with that, then I maybe get the indoor cam or the Ring floodlight cam. As you can see, with Ring you can really customize your home security, which does a few things: allows you to get comfortable with the tech + gives you time to build a robust home security network on your property.
by Staff | Oct 24, 2022 | Reviews, Smart Home
It’s no secret that home security is a big deal. And if you’re like most people, you’re probably on the lookout for a good, affordable system that will keep your family safe. Having the ability to monitor your property even if you are not there with security cameras is important. And there are two brands that are solid entry-level home security systems: Ring and Blink. But which one should you choose? We break down all the ins and outs as we compare and contrast what you need to look for in an entry-level home security system.
Ring Vs Blink: Comparison
I love entry-level DIY home security systems. Why? One reason is these security cameras and video doorbells cost significantly less than your high-end CCTV systems. Alternatively, they can store video locally, accessible anytime via WiFi. Blink and Ring might be on your radar if you’re looking for easy-to-use DIY home security. Amazon owns both brands, but how do they compare? Ring and Blink differ in their focus.
RELATED: Here’s A Crash Course In Home Automation Basics
At the root of their products is security, but the value prop differs slightly. A Ring Security System combines cameras, doorbells, sensors, and smart lights, while Blink offers affordable cameras. They do have a video floodlight now added to the lineup, but Blink is all about cameras.
Ring Vs Blink: What’s Similar
Both Ring and Blink offer a variety of products and include well-designed features of their product offering. Both are founded on simplicity. Both allow you to easily integrate their devices into existing smart home automation. Here are a handful of other similarities:
- You don’t have to sign long-term contracts. If you want to cancel, you can. If you don’t want a long-term contract or you don’t want to sign up for a plan, you can still use the devices!
- Ring and Blink setup was easy. For ease of use, each brand provided videos and top-notch How-To content.
- A variety of Blink cameras are available. Ring offers multiple indoor and outdoor cameras: the Indoor Cam, Spotlight Cam, and Floodlight Cam.
- Each system lets us monitor our homes using a mobile app. Each app is intuitive and is one you will find yourself using often.
- Both work with Alexa.
TRENDING NOW: The DIY Home Security Smart Light Bulb
Ring Vs Blink: What’s Different
For all the ways these are the same, there are some differences between Ring and Blink. Most of your differences will reside in the tech and each tech’s purpose. With Ring, you get cameras, lights, sensors, and a hub. You also get additional community features and emergency support. With Blink, it’s just about visual monitoring through cameras. Here are some of the key differences of note:
- Blink offers 30-day refunds. The Ring can’t. However, if you buy from Amazon you will get to take advantage of their 30 days refund policy (make sure you buy from Amazon).
- Cloud storage is available from both companies, but only Blink offers local storage of up to 265 GB, but you have to have the Sync Module 2.
- All Blink cameras are wireless except the Mini. Ring cameras accept batteries, cords, and solar power, and Power modes are even available.
- Blink is about self-monitoring through video. Ring is geared towards whole-home security.
Ring Vs Blink: Streaming Video And Audio
Video and audio quality between Blink and Ring cameras are generally similar. Testing both brands’ products has always shown clear video and audio. Blink and Ring motion-activated cameras capture HD color video during the day. Some Ring and Blink home security cameras include integrated lights to record color video at night.
Blink’s cameras are slightly inferior to Ring’s. First with the view field. Outdoor Ring cameras cover about 140 degrees, while indoor Blink cameras cover 110 degrees. Covering a wider area prevents blind spots. This can be remedied with more cameras, but fewer cameras mean less money in the long run. The two-way audio features for both systems are really good. Having used both of these, I’d say the Ring is slightly better and doesn’t have as much of a feed lag as Blink, but both have great sound quality.
DISCOVER: Home Automation? What Is That? We Answer That And More!
People Only is also available on Ring’s cameras that only alert you if someone moves. Blink doesn’t offer this feature. Blink does have motion activity and you can set up zones (via a still image), so you can kind of achieve the same effect. But the People only feature on the Ring is solid.
Winner: Ring
Ring Vs Blink: Setup
Blink and Ring work well. Each system took less than an hour to install. For novice users, neither of these DIY home security systems should take more than an hour. If it is, seek their support or opt-in for a professional installation. Professional installation is only available from Ring. I haven’t tried it out, but I do know people who have had Ring professionally installed and it’s done by contracted professionals based on your region. It’s an extra fee, but if you are REALLY green in this setup area…Ring has the edge here.
What To Expect With A Blink Setup
Overall, it’s an easy setup for Blink cameras. You’ll want to sign up for Blink’s subscription plan to unlock all the features of its services. You can get a free trial. We needed a module system too. It’s Sync Module 2 and it supports Blink Minis as well. We plugged in Sync Module 2. After that, we had to set it up our WiFi. This process up to this point took like 15-20 minutes.
LEARN MORE: Ring Video Doorbell Tips And Tricks
We then set up the cameras. We installed the batteries using the included tool. QR codes connect Sync Modules to the devices. Following the installation process, we renamed the cameras in the app. Went off without a hitch. You can mount all Blink cameras on the wall, table, ceiling, or shelf. We mounted our Blink Indoor at the back of our house and our Blink Outdoor at the front to deter burglars.
Winner: Ring
Ring Vs Blink: Connectivity And Apps
Ring Protect subscribers can also view previous footage captured with the Ring app. You get a similar feature with Blink’s subscription. I’ve tried using both systems without the plans and quite honestly, I really like to be able to look at the footage in the cloud from a month ago. There are ways to store that footage in a NAS device, but that’s for more advanced users and would require you to purchase one like the Synology NAS unit. Additionally, both platforms notify your smartphone with detailed alerts.
Alexa integration is no surprise since Amazon owns both. Alexa-enabled smart speakers let you speak to anyone in the camera’s field of view or make noise when motion is detected. And you can view both feeds on Amazon’s smart displays.
READ MORE: Best IFTTT Home Security Systems
I love the ability that both systems have with IFTTT. Blink has some quality IFTTT integrations and recipes to take your smart home automation to the next level. You can do things like automatically arm your Blink system when you leave your home or get a text message when motion is detected at night. Don’t fret, Ring has these IFTTT integrations as well. In fact, Ring has a more robust offering when it comes to these automation recipes.
Winner: Ring
Ring’s Professional Monitoring
Professional-grade monitoring is only available on Ring. Ring Protect Plus provides 24/7 monitoring and motion sensors send alerts to the monitoring center in case of a break-in. The Ring has account reps who review alerts and surveillance footage to determine if a home is in danger.
A Side Note About Self-Monitoring
Although you won’t get professional monitoring from service with reps that help you keep your home safe, self-monitoring your home is easy with Blink. Mobile notifications alert you when movement is detected. In response, you can check your recorded clips or log in to see our live stream.
In A Nutshell
Blink and Ring are both simple and effective entry-level home security. With a Blink security camera, you’ll save money and space. On the flip side, Ring has more features geared towards whole-home security. Determining which one is better, really comes down to which one is more aligned with your needs for home security. It’s an important thing to consider. If you want just a casual system where you do most of the monitoring and you don’t want something too robust, Blink is a great option. Personally, I love Ring. All of their products sync together nicely so you can start out simple with a video doorbell and then build a home security system tailored to your needs. I love that Ring works well with Google Assistant, Apple HomeKit, and Samsung SmartThings. I love that Ring has the Neighbor app where I can real-time and up-to-date community reporting on crime and nefarious activity. The list of things I love about Ring is long, which is why
by Dale Meredith | Oct 21, 2022 | Smart Home, Tech Living
Are you looking for ways to make your life easier? Maybe you want a better way to make your smart devices help you create the smart home that works for you. Google has a host of great tools and features that can help. And one of our favorites is Routines. With Routines, you can create custom commands that run multiple actions with a single voice command. This can save you time and hassle in the morning, during your commute, or when you’re winding down for bed.
If you’re not using Google Routines right now, you’re doing the whole smart home automation thing wrong. In this guide, we’ll show you all of the best Google Routines. We’ll walk through some of our favorite routines. Whether you’re looking to get organized, stay in the know on news and weather, or just want an easier way to do things around the house, check out these fun and effective Google Routines ideas.
DISCOVER: Smart Home Automation Ideas You’ll Love
Google Routines 101
Before we get in too deeply on these, let me explain what a Google Routine is in the first place. Some of you reading this might be thinking, ‘What the heck is a Google Routine?’ They’re actually a pretty easy concept to understand. They’re even easier to implement as well. Straight from the Google website, it says, “A routine is a series of actions you want your devices to take automatically when prompted by voice command or through the Google Home app. You can speak the command through a Nest speaker or display (Nest Audio, Nest Mini, or Nest Hub Max ) or even your phone.” I’ll add to that by saying that it’s simply a set of actions you want smart devices in your home to do based on criteria that you personalize. You need other smart devices (and a Google Assistant) to be able to work together to perform these routines. For example, when I walk through the front door I could say, “Hey Google, I’m home.” From there, the lights in my living room turn on, the TV turns on to ESPN, and the smart thermostat temperature gets set to 73. Pretty cool, right? Here’s why a function like Google Routines is so important, it’s because it allows you to really control the tech in your life instead of the tech controlling you.
And here’s the extra bonus with Routines, you don’t have to be at home to do them. For example, if you aren’t home and you can’t remember if you locked up the home, you can tell your Android phone (or using the Google Assistant app) “Hey Google, secure my home” and all the actions assigned to that Routine will deploy: locked doors, Ring camera armed, thermostat set at 68, flood lights turned on, and the garage door closes (if left open). And it doesn’t have to be voice-activated either. If I’m on vacation, I can set this Routine to deploy every night at 9 PM.
Some Of The Best Google Routines
There are seriously thousands upon thousands of permutations you can employ with Google Routines. As long as the device connects with Google Assistant, you’re good to go. I’ve seen some really interesting Google automation and routines. Some I think are fun to say or fun to imagine, but I’m all about practicality.
LEARN MORE: Best IFTTT Home Security Systems
Good Morning
I personally use “Okay Google, Good Morning” almost every day. It’s a schedule routine that operates as a functional or informational alarm clock. If I wake up before the scheduled alarm goes, I have to manually say the words. For this routine, my speaker has a set volume (louder than when it’s at night), reports the upcoming weather for the day, gives me the news (from the source I want), tells me what I have on my calendar, reads to me my reminders, and takes my phone off silent. Boom…with one extensive routine, I’m hitting the ground running and ready for my day.
A couple of neat things you can do with a good morning routine if you have the technology is to open or close your curtains or you could have shades open or close. You can also have your coffee start to be made the minute you wake up as well.
RELATED: Simple And Smart Kitchen Appliances
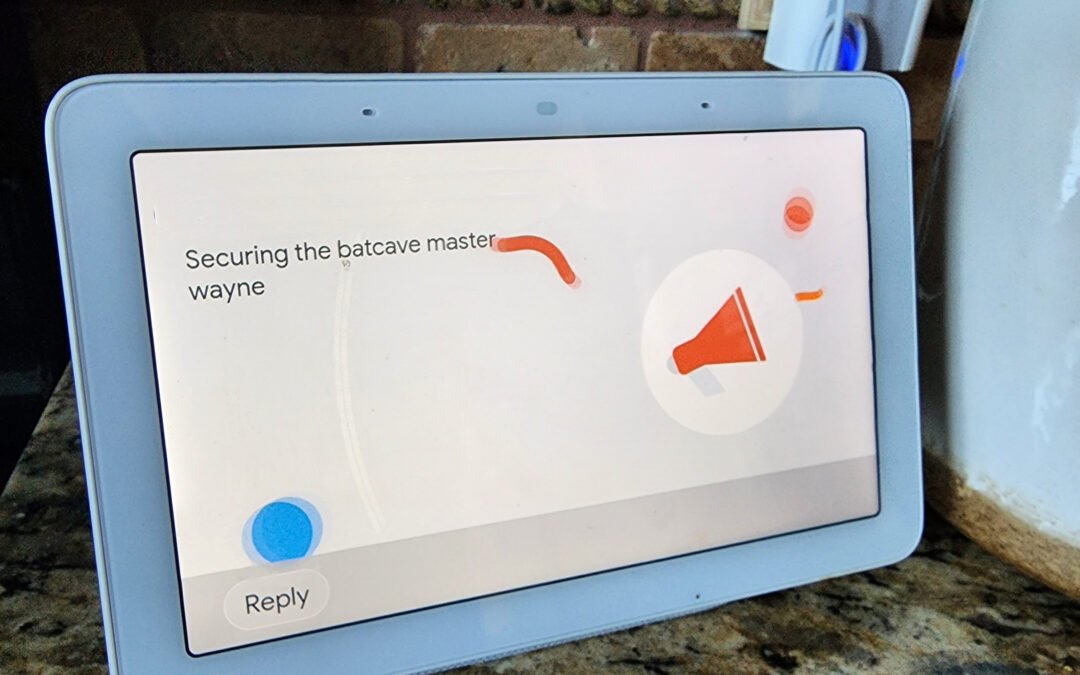
Secure The Batcave
I’ve mentioned this one before. It aligns with this idea of mixing home automation devices in your life to really make tech work for you. I simply say, “Hey Google, Secure the Batcave.” Then all my doors lock (you need smart locks ____I personally have Kwikset SmartCode 916 deadbolt on all my exterior doors, including the door leading to the garage ), my Ring camera is armed, my smart floodlights are enabled, all the lights in my house are turned down, and the temperature is set at a cool 70 degrees by my smart thermostat.
I’m Going Downstairs
I have a personal den. It’s where I like to hangout. Sometimes I work there. Sometimes to get away. When I go downstairs, I can say, “Hey Google, I’m going downstairs.” My den lights get turned on to a specified brightness. I have a set of string LED lights that turn on. My TV turns on to my favorite streaming channel. And a portable fan turns on. I’ve thought about having an air freshener or air purified turn on, but don’t know yet if that’s taking this overboard 😉
I’m Getting Ready For Bed
This is one I didn’t think I’d use that much, but I’m finding that I love it more and more. I find I use it about 30 minutes to an hour before my head hits the pillow. I’ve also found new tweaks to add to this routine as well. I’ll say, “Hey Google, I’m Getting Ready For Bed.” From here, all the smart lights in my home drop 30% brightness. My bedroom fan turns on at low speed (I like fresh air when I sleep). And each of my kids gets a notification that they need to get ready for bed.
TRENDING: Setup An Easy and Cheap Smart Home Intercom System
Movie Time
When we watch movies, this one is fun. I can say, “Hey Google, It’s movie time!” The lights in our living room get turned off, (if I had them) the smart blinds could close, the TV turns on to Netflix (or your favorite streaming channel), and we’re ready to watch our favorite flix.
Vacation Mode
This is another go-to favorite. When engaged, my Phillips Hue lights (color versions) will light up and flicker in my bedroom and living room with various colors during the night until about 1 am. From the outside it looks like someone is literally watching TV (I could have the TV turned on as well in this Routine as well, but I like the way the Phillips Hue lights work). Then at various times during the night different lights will come on and off making it look like someone is up and moving around. This is a clever Google Routine trick, but it’s effective.
Why I Love Google Routines
There are so many things to love about Google Routines! They are one of the most important factors in making your home truly smart. First of all, they make it super easy to manage your day-to-day tasks and make your tech work for you. With just a simple voice command or a click, you can create and edit your routines, schedule reminders, turn a light on or off, lock doors, enable your security cameras, set goals, and a slew of other amazing combinations. Plus, the Google Home interface is extremely user-friendly and the features are constantly updated. But perhaps my favorite thing about Routines is that they help me stay in control of the tech in my home and allow me to leverage what smart devices are really intended to do.
BOOKMARK THIS: Basic Smart Home Automation Tips
Yes, it’s cool to be able to turn lights on or off with a simple prompt. But to say, “Hey Google, I’m stressed,” followed by my lights being dimmed, a relaxing tune then being played from my smart speaker, followed by my doors being locked, and outside cameras turned on is the key to unlocking the “smart” in our tech.